打印组件
系统提供打印组件,通过定义 Handlebars 语义模板,将数据按照一定的格式生成 pdf 文件,用于打印,支持打印图片
组件
属性
- 打印模板
打印组件使用的模板文件,文件后缀为 .print.tpl,例如:/UI2/pcx/md.print.tpl。进入“代码”页面,在 UI2 目录下,新建模板文件:/UI2/pcx/md.print.tpl
- 打印数据
选择页面上的一个数据组件。打印组件将这个数据组件中的数据,作为 file 请求的参数传给模板文件,在模板文件中,使用 {{#each data}} 遍历
- 附加数据
选择页面上的多个数据组件。打印组件将这几个数据组件中的数据,作为 file 请求的参数传给模板文件,在模板文件中,使用 {{#each context.datas.data的id}} 遍历
- 导出文件名
定义文件名
- 打印上下文
JSON 格式数据,例如: {key:value}。打印组件将这个数据,作为 file 请求的参数传给模板文件,在模板文件中,使用 {{context.key}} 访问
- 打印参数
页面大小:选择一个纸张,例如 A4、B5
打印参数:参考 https://www.cnblogs.com/lh460795/p/6549398.html,本文介绍了横向打印的设置方法
操作、方法
打印组件提供“预览”操作和 preview 方法,用于在浏览器中显示 pdf 文件
打印组件提供“打印”操作和 print 方法,用于下载 pdf 文件
事件
打印组件提供“打印前”事件,支持通过 event.cancel 停止打印
数据格式
打印组件调用 excel/export/file 请求生成 pdf 文件,请求的参数包括模板文件中访问的数据。下面列出了一套数据,了解其中的数据格式,便于在模板文件中访问数据
{
    "rows": [
        {
            "fid": "99EA18115CCA44A4B2855FAACB7D36BC",
            "orderNo": "order101",
            "orderDate": "2024-05-01",
            "money": 212233,
            "orderd": [
                {
                    "fid": "26DE9DD54EF74DFB897BEC776FC05137",
                    "orderm": "99EA18115CCA44A4B2855FAACB7D36BC",
                    "productId": "id0001",
                    "price": 100,
                    "num": 5333322
                },
                {
                    "fid": "61289BD271E341F78E4F0513834946E6",
                    "orderm": "99EA18115CCA44A4B2855FAACB7D36BC",
                    "productId": "id0003",
                    "price": 100,
                    "num": 3143
                }
            ]
        },
        {
            "fid": "CB4AD2A16BBF46F1AAB342DF75B61958",
            "orderNo": "order102",
            "orderDate": "2024-05-01",
            "money": null,
            "orderd": [
                {
                    "fid": "BE91DFEC0CE3419B9411461812429C2F",
                    "orderm": "CB4AD2A16BBF46F1AAB342DF75B61958",
                    "productId": "id0002",
                    "price": 100,
                    "num": 3
                }
            ]
        }
    ],
    "context": {
        "printer": "system",
        "printDate": "2024-09-18",
        "datas": {
            "productData": [
                {
                    "fid": "CAE4CB5E6F400001C26AAAF0856B8D00",
                    "name": "笔记本",
                    "price": 111,
                    "images": [
                        {
                            "url": "http://reactdevguide8-amanda-ide.trunk2.xcaas.com:8800/storage/getObject?storeFileName=anoy_CAE6C86433C000012CED132615057F50&operateType=browse&fullfilename=anoy_CAE6C86433C000012CED132615057F50"
                        }
                    ]
                },
                {
                    "fid": "CAE4CDFEDA7000018EA21735A7D0D940",
                    "name": "一体机",
                    "price": 222,
                    "images": [
                        {
                            "url": "http://reactdevguide8-amanda-ide.trunk2.xcaas.com:8800/storage/getObject?storeFileName=anoy_CAE6C86B58700001E5B01E8EC2802C30&operateType=browse&fullfilename=anoy_CAE6C86B58700001E5B01E8EC2802C30"
                        }
                    ]
                }
            ]
        },
        "sum1": 2000,
        "sum2": 5000
    }
}
- rows 是“打印数据”属性关联的数据组件中的数据,本例中该数据集设置了输出数据集,因此数据中包括从表数据 orderd
- 在模板文件中,使用 {{#each data}} 遍历 rows 中的数据,其中 data 是固定写法
- 在 {{#each data}} 中使用 {{#each orderd}} 遍历从表数据,其中 orderd 是 rows 中从表数据的 key
- context 中的数据分为三部分
- printer 和 printDate:当前人和当前时间,是系统默认提供的两个参数
- datas:里面是“附加数据”属性中选择的数据组件中的数据,在模板文件中,使用 {{#each context.datas.data的id}} 遍历,例如本例使用 {{#each context.datas.productData}} 遍历
- 其它:是“打印上下文”属性中写入的数据,本例如下图所示,在模板文件中,使用 {{context.key}} 访问,例如本例使用 {{context.sum1}} 访问

打印当前人、当前时间
打印组件默认提供当前人和当前时间,在模板中通过 {{context.printer}} 获取当前人,通过 {{context.printDate}} 获取当前时间
特别说明
- 当前人是通过上下文组件获取的,因此在页面上添加上下文组件后,才能获取当前人
打印单表数据
打印一个数据集中的数据,打印效果如下图所示

例如打印商品数据集,商品数据集的结构如下图所示

在页面上添加商品数据集组件,设置打印组件的"打印数据"属性为商品数据集
打印模板文件内容如下
<html>
    <head>
        <meta charset="UTF-8">
            <title>商品列表</title>
            <style type="text/css">
                .head{
                }
                .footer {
                }
                .table {
                border: 1px solid #dddddd;
                }
                .print-item{
                display: table-row;
                page-break-inside: avoid;
                }
                .print-item > .print-item-label,
                .print-item > .print-item-value{
                border: 1px solid #dddddd;
                padding: 8px;
                display: table-cell;
                }
                .print-item > .print-item-label{
                width: 30%;
                vertical-align: middle;
                text-align: center;
                }
                .table ,
                .child-table > .print-item-value{
                padding: 0;
                border-collapse: collapse;
                border-spacing: 0;
                width: 100%;
                display: table;
                }
                .child-table > .print-item-value{
                margin: -1px;
                }
                .printer,.print-date{
                padding-left: 60%;
                }
                .Image > .print-item-value > img{
                max-width: 100%;
                height: 100px;
                }
            </style>
        </<meta>
    </head>
    <body style="margin: 28px;">
        <div class="head">
            <h1 class="title">商品列表</h1>
        </div>
        <div class="table">
            {{#each data}}
            <div class='print-item String'>
                <div class='print-item-label'>名称</div>
                <div class='print-item-value'>{{{name}}}</div>
            </div>
            <div class='print-item DateTime'>
                <div class='print-item-label'>添加日期时间</div>
                <div class='print-item-value'>{{{createDateTime}}}</div>
            </div>
            <div class='print-item Integer'>
                <div class='print-item-label'>单价</div>
                <div class='print-item-value'>{{{price}}}</div>
            </div>
            <div class='print-item Image'>
                <div class='print-item-label'>图片</div>
                <div class='print-item-value'>
                    {{#each images}}
                    <img src="{{{url}}}"/>
                    {{/each}}
                </div>
            </div>
            {{/each}}
        </div>
        <div class="footer">
            <h4 class="printer">打印人:{{context.printer}}</h4>
            <h4 class="print-date">打印时间:{{context.printDate}}</h4>
        </div>
    </body>
</html>
打印模板说明
- {{#each data}}: data 是规定写法,指的是打印数据属性对应的数据集,each 是遍历数据集的每一行,即不是打印数据集的当前行,而是打印数据集中的所有行。如果包括从表,可打印从表,参考“打印主从数据”
- {{{mingcheng}}}: mingcheng 是列标识,用于打印列内容
- 如果不需要循环数据,而是打印数据集的当前行数据,不需要写 each,在要打印的数据列的地方用 {{data.[0].mingcheng}} 即可
- {{#each images}}
<img src="{{{url}}}"/>{{/each}}:打印使用附件组件上传的图片的写法,其中 images 是列名,url 是固定写法 - {{context.printer}}: 系统默认值,用于打印当前人
- {{context.printDate}}: 系统默认值,用于打印当前时间
- style 中的样式均可自行调整
打印主从数据
打印主从数据,需在主数据集上设置输出数据集,形成主从 JSON 数据,打印效果如下图所示
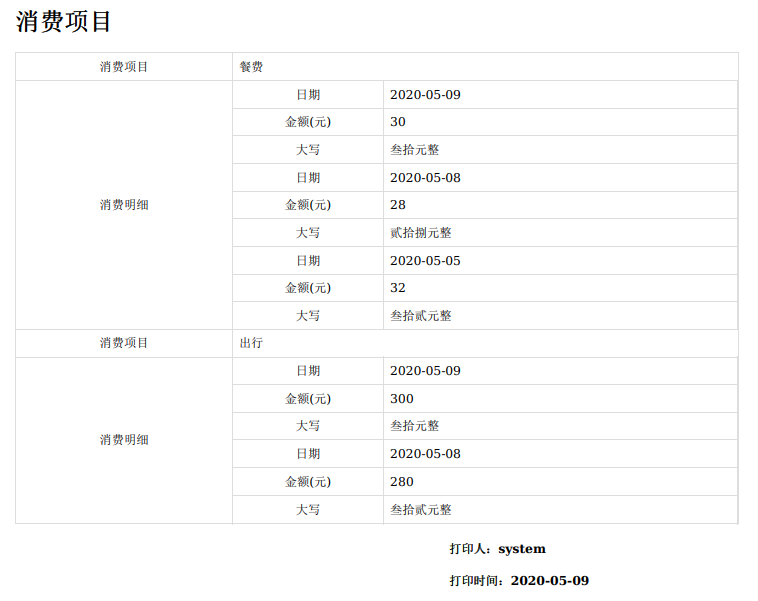
打印主从表,只设置打印组件的“打印数据”属性为主表数据集即可
打印模板文件内容如下
            <html>
               <head>
                  <meta charset="UTF-8">
                  <title>消费项目</title>
                  <style type="text/css">
                     .head{
                     }
                     .footer {
                     }
                     .table {
                        border: 1px solid #dddddd;
                     }
                     .print-item{
                        display: table-row;
                        page-break-inside: avoid;
                     }
                     .print-item > .print-item-label,
                     .print-item > .print-item-value{
                        border: 1px solid #dddddd;
                        padding: 8px;
                        display: table-cell;
                     }
                     .print-item > .print-item-label{
                        width: 30%;
                        vertical-align: middle;
                        text-align: center;
                     }
                     .table ,
                     .child-table > .print-item-value{
                        padding: 0;
                        border-collapse: collapse;
                        border-spacing: 0;
                        width: 100%;
                        display: table;
                     }
                     .child-table > .print-item-value{
                        margin: -1px;
                     }
                     .printer,.print-date{
                        padding-left: 60%;
                     }
                     .Image > .print-item-value > img{
                        max-width: 100%;
                        height: auto;
                     }
                  </style>
               </head>
               <body style="margin: 28px;">
                  <div class="head">
                     <h1 class="title">消费项目</h1>
                  </div>
                  <div class="table">
                     {{#each data}}
                        <div class='print-item String'>
                           <div class='print-item-label'>消费项目</div>
                           <div class='print-item-value'>{{{xiaofeixm}}}</div>
                        </div>
                        {{#if dbmxiaofei_xmxiaofeimx}}
                           <div class='print-item child-table'>
                              <div class='print-item-label'>消费明细</div>
                              <div class='print-item-value'>
                                 {{#each dbmxiaofei_xmxiaofeimx}}
                                    <div class='print-item Date'>
                                       <div class='print-item-label'>日期</div>
                                       <div class='print-item-value'>{{{_deft_riji}}}</div>
                                    </div>
                                    <div class='print-item Double'>
                                       <div class='print-item-label'>金额(元)</div>
                                       <div class='print-item-value'>{{{_deft_jine_y__}}}</div>
                                    </div>
                                    <div class='print-item String'>
                                       <div class='print-item-label'>大写</div>
                                       <div class='print-item-value'>{{{_deft_jine_y__Chn}}}</div>
                                    </div>
                                 {{/each}}
                              </div>
                           </div>
                        {{/if}}
                     {{/each}}
                  </div>
                  <div class="footer">
                     <h4 class="printer">打印人:{{context.printer}}</h4>
                     <h4 class="print-date">打印时间:{{context.printDate}}</h4>
                  </div>
               </body>
            </html>
打印模板说明
- {{#each dbmxiaofei_xmxiaofeimx}}:dbmxiaofei_xmxiaofeimx 是从数据的 id
- {{#if dbmxiaofei_xmxiaofeimx}}: 是判断是否有从数据
打印附加数据
当需要打印的数据不只一个数据集,也不是一主一从或一主多从数据集时,可在打印组件的“附加数据”属性中选择要在打印模板中访问的数据集
打印模板文件内容如下
            <html>
               <head>
                  <meta charset="UTF-8">
                  <title>打印非主从数据</title>
                  <style type="text/css">
                     .head{
                     }
                     .footer {
                     }
                     .table {
                        border: 1px solid #dddddd;
                     }
                     .print-item{
                        display: table-row;
                        page-break-inside: avoid;
                     }
                     .print-item > .print-item-label,
                     .print-item > .print-item-value{
                        border: 1px solid #dddddd;
                        padding: 8px;
                        display: table-cell;
                     }
                     .print-item > .print-item-label{
                        width: 30%;
                        vertical-align: middle;
                        text-align: center;
                     }
                     .table ,
                     .child-table > .print-item-value{
                        padding: 0;
                        border-collapse: collapse;
                        border-spacing: 0;
                        width: 100%;
                        display: table;
                     }
                     .child-table > .print-item-value{
                        margin: -1px;
                     }
                     .printer,.print-date{
                        padding-left: 60%;
                     }
                     .Image > .print-item-value > img{
                        max-width: 100%;
                        height: auto;
                     }
                  </style>
               </head>
               <body style="margin: 28px;">
                  <div class="head">
                     <h1 class="title">打印非主从数据</h1>
                  </div>
                  <div class="table">
                     {{#each data}}
                        <div class='print-item String'>
                           <div class='print-item-label'>单行文本</div>
                           <div class='print-item-value'>{{{_deft_danxingwb}}}</div>
                        </div>
                        <div class='print-item LongText'>
                           <div class='print-item-label'>多行文本</div>
                           <div class='print-item-value'>{{{_deft_duoxingwb}}}</div>
                        </div>
                     {{/each}}
                  </div>
                  {{#each context.datas.restData1}}
                     <div class='print-item String'>
                        <div class='print-item-label'>用品</div>
                        <div class='print-item-value'>{{{name}}}</div>
                     </div>
                  {{/each}}
                  <div class="footer">
                     <h4 class="printer">打印人:{{context.printer}}</h4>
                     <h4 class="print-date">打印时间:{{context.printDate}}</h4>
                     <h4 class="print-date">我的用品:{{context.datas.restData1.[0].name}}</h4>
                  </div>
               </body>
            </html>
打印模板说明
- {{#each context.datas.restData1}}:restData1 是数据组件的 id,在打印模板中访问附加数据中的数据组件的方法是 context.datas.数据组件id
- {{context.datas.restData1.[0].name}}:表示取出 restData1 数据组件中第一行 name 列的值
使用附件数据打印主从数据
不设置主从,通过模板中使用 ifCond 进行数据循环判断
在页面上添加主表、从表1和从表2数据集组件,清空从表1和从表2的主从选项属性
添加打印组件,设置打印组件的"打印数据"属性为主表数据集,“附加数据”属性选择从表1和从表2
打印模板文件内容如下
    <html>
        <head>
            <meta charset="UTF-8">
            <title>主页</title>
            <style type="text/css">
                .head{
                }
                .footer {
                }
                .table {
                    border: 1px solid #dddddd;
                }
                .print-item{
                    display: table-row;
                    page-break-inside: avoid;
                }
                .print-item > .print-item-label,
                .print-item > .print-item-value{
                    border: 1px solid #dddddd;
                    padding: 8px;
                    display: table-cell;
                }
                .print-item > .print-item-label{
                    width: 30%;
                    vertical-align: middle;
                    text-align: center;
                }
                .table ,
                .child-table > .print-item-value{
                    padding: 0;
                    border-collapse: collapse;
                    border-spacing: 0;
                    width: 100%;
                    display: table;
                }
                .child-table > .print-item-value{
                    margin: -1px;
                }
                .printer,.print-date{
                    padding-left: 60%;
                }
                .Image > .print-item-value > img{
                    max-width: 100%;
                    height: auto;
                }
            </style>
        </head>
        <body style="margin: 28px;">
            <div class="head">
                <h1 class="title">主页</h1>
            </div>
            <div class="table">
                {{#each data}}
                <div class='print-item String'>
                    <div class='print-item-label'>编码</div><div class='print-item-value'>{{[fno}}]</div>
                </div>
                <div class='print-item Datetime'>
                    <div class='print-item-label'>日期</div><div class='print-item-value'>{{[fdate}}]</div>
                </div>
                <div class='print-item child-table'>
                    <div class='print-item-label'>从表1</div>
                    <div class='print-item-value'>
                        <!--从表打印 循环使用从表数据xid-->
                        {{#each ../context.datas.restData1}}
                        {{#ifCond zhubiao '==' ../fid}}
                            <div class='print-item String'>
                                <div class='print-item-label'>名称</div><div class='print-item-value'>{{[fname}}]</div>
                            </div>
                            <div class='print-item Integer'>
                                <div class='print-item-label'>单价</div><div class='print-item-value'>{{[fprice}}]</div>
                            </div>
                        {{/ifCond}}
                        {{/each}}
                    </div>
                </div>
                <div class='print-item child-table'>
                    <div class='print-item-label'>从表2</div>
                    <div class='print-item-value'>
                        {{#each ../context.datas.restData2}}
                        {{#ifCond zhubiao '==' ../fid}}
                            <div class='print-item Integer'>
                                <div class='print-item-label'>数量</div><div class='print-item-value'>{{[fnum}}]</div>
                            </div>
                            <div class='print-item Integer'>
                                <div class='print-item-label'>金额</div><div class='print-item-value'>{{[fmoney}}]</div>
                            </div>
                        {{/ifCond}}
                        {{/each}}
                    </div>
                </div>
                {{/each}}
            </div>
            <div class="footer">
                <h4 class="printer">打印人:{{context.printer}}</h4>
                <h4 class="print-date">打印时间:{{context.printDate}}</h4>
            </div>
        </body>
    </html>
打印模板说明
- {{#each ../context.datas.restData1}}:context.datas.restData1 是访问附加数据的写法,restData1 是附加数据的 id
- {{#ifCond zhubiao '==' ../fid}}:比较主键和外键是否相等。zhubiao 是从表的外键列,../fid 表示主表的主键
- ifCond 比较符支持
==、===、!=、!==、>、<、>=、<=、&&、||
- ifCond 比较符支持
- 使用此模板,分别加载主表和从表的数据,为保证加载完整,注意将从表的分页大小设置为-1
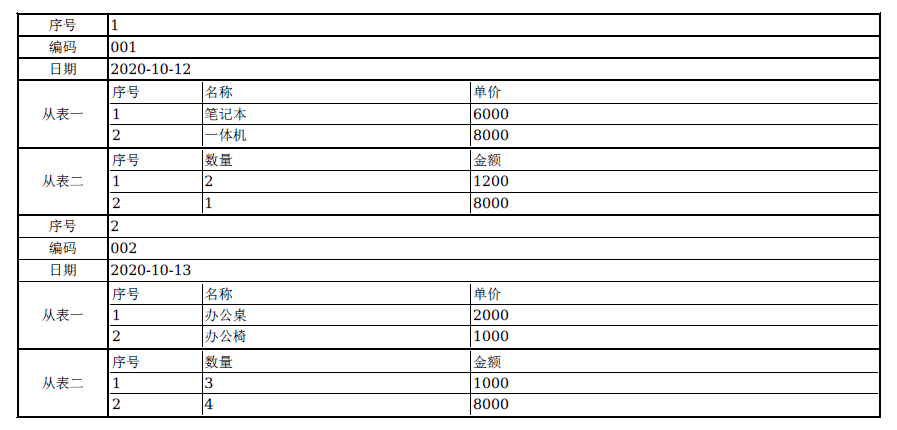
打印主从并加序号
打印一个主表及其多个从表的数据,主表和从表都打印序号,打印效果如下图所示
不设置主从,通过模板中使用数据循环判断,需要用 ejs 模版
定义一张主表和两个从表
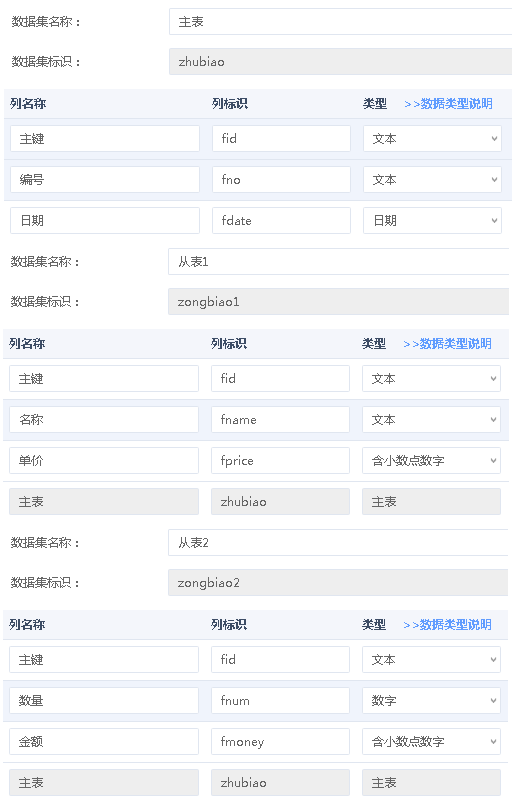
在页面上添加主表、从表1和从表2数据集组件,清空从表1和从表2的主从选项属性
添加打印组件,设置打印组件的"打印数据"属性为主表数据集,“附加数据”属性选择从表1和从表2
打印模版的文件后缀为.print.ejs
打印模板文件内容如下
        <html>
        <head>
            <title>my ejs template</title>
            <meta http-equiv="Content-Type" content="text/html; charset=utf-8">
        </head>
        <body>
            <table style="width:100%;" cellpadding="2" cellspacing="0" border="1" bordercolor="#000000">
                <tbody>
                    <% for(var i=0;i<data.length ; i ++){ %>
                        <tr>
                            <td style="text-align:center;">
                                序号
                            </td>
                            <td>
                                <span><%= i+1%></span>
                            </td>
                        </tr>
                        <tr>
                            <td style="text-align:center;">
                                编码
                            </td>
                            <td>
                                <%= data[i].fno%>
                            </td>
                        </tr>
                        <tr>
                            <td style="text-align:center;">
                                日期
                            </td>
                            <td >
                                <span><%= data[i].fdate%></span>
                            </td>
                        </tr>
                        <tr>
                            <td style="text-align:center;">
                                从表一
                            </td>
                            <td style="text-align:center;">
                                <table style="width:100%;" cellpadding="2" cellspacing="0">
                                    <tbody>
                                        <tr>
                                            <td style="border-right:#000000 solid 1px;" width="100px">
                                                序号
                                            </td>
                                            <td style="border-right:#000000 solid 1px;"  width="300px">
                                                名称
                                            </td>
                                            <td>
                                                单价
                                            </td>
                                        </tr>
                                        <% var data1 = context.datas.restData1 %>
                                        <% var k=0 %>
                                        <% for(var j=0;j<data1.length;j++){ %>
                                            <%if(data1[j].zhubiao == data[i].fid){%>
                                                <tr>
                                                    <td style="border-top:#000000 solid 1px;border-right:#000000 solid 1px;">
                                                        <span><%= ++k %></span>
                                                    </td>
                                                    <td style="border-top:#000000 solid 1px;border-right:#000000 solid 1px;">
                                                        <span><%= data1[j].fname%></span>
                                                    </td>
                                                    <td style="border-top:#000000 solid 1px;">
                                                        <span><%= data1[j].fprice%></span>
                                                    </td>
                                                </tr>
                                            <%}%>
                                        <%}%>
                                    </tbody>
                                </table>
                            </td>
                        </tr>
                        <tr>
                            <td style="text-align:center;">
                                从表二
                            </td>
                            <td style="text-align:center;">
                                <table style="width:100%;" cellpadding="2" cellspacing="0">
                                    <tbody>
                                        <tr>
                                            <td style="border-right:#000000 solid 1px;" width="100px">
                                                序号
                                            </td>
                                            <td style="border-right:#000000 solid 1px;" width="300px">
                                                数量
                                            </td>
                                            <td>
                                                金额
                                            </td>
                                        </tr>
                                        <% var data2 = context.datas.restData2 %>
                                        <% var k =0 %>
                                        <% for(var j=0;j<data2.length;j++){ %>
                                            <%if(data2[j].zhubiao == data[i].fid){%>
                                        <tr>
                                            <td style="border-top:#000000 solid 1px;border-right:#000000 solid 1px;">
                                                <span><%= ++k %></span>
                                            </td>
                                            <td style="border-top:#000000 solid 1px;border-right:#000000 solid 1px;">
                                                <span><%= data2[j].fnum%></span>
                                            </td>
                                            <td style="border-top:#000000 solid 1px;">
                                                <span><%= data2[j].fmoney%></span>
                                            </td>
                                        </tr>
                                            <%}%>
                                        <%}%>
                                    </tbody>
                                </table>
                            </td>
                        </tr>
                    <% } %>
                </tbody>
            </table>
        </body>
    </html>
打印模板说明
<% var data1 = context.datas.restData1 %>是访问附加数据的写法,restData1 是附加数据的 id<% for(var j=0;j<data1.length;j++){ %><%if(data1[j].zhubiao == data[i].fid){%>比较主键和外键是否相等。zhubiao 是从表的外键列,见上面的数据结构定义。fid 表示主表的主键- 使用此模板,分别加载主表和从表的数据,为保证加载完整,注意将从表的分页大小设置为-1
横向打印
打印时如果默认要横向打印,可以在打印参数中设置--orientation Landscape,注意需要写为字符串,如下图所示

分页打印
批量打印单据,一个单据占一页。使用打印组件,在打印模板中添加分页代码,实现分页
最简单的分页代码
            <html>
                <head>
                    <meta charset="UTF-8">
                    <title>分页打印</title>
                    <!--media=print   这个属性可以在打印时有效-->
                    <style media="print">
                        .PageNext{
                            page-break-after: always;
                        }
                    </style>
                </head>
                <body>
                    <div>第一页</div>
                    <!--分页-->
                    <div class="PageNext"></div>
                    <div>第二页</div>
                </body>
            </html>
一个主表打印一页的案例
            <html>
                <head>
                    <meta charset="UTF-8">
                    <title>分页打印</title>
                    <!--media=print   这个属性可以在打印时有效-->
                    <style media="print">
                        .PageNext{
                            page-break-after: always;
                        }
                    </style>
                    <style type="text/css">
                        .head{
                        }
                        .footer {
                        }
                        .table {
                            border: 1px solid #dddddd;
                        }
                        .print-item{
                            display: table-row;
                            page-break-inside: avoid;
                        }
                        .print-item > .print-item-label,
                        .print-item > .print-item-value{
                            border: 1px solid #dddddd;
                            padding: 8px;
                            display: table-cell;
                        }
                        .print-item > .print-item-label{
                            width: 30%;
                            vertical-align: middle;
                            text-align: center;
                        }
                        .table ,
                        .child-table > .print-item-value{
                            padding: 0;
                            border-collapse: collapse;
                            border-spacing: 0;
                            width: 100%;
                            display: table;
                        }
                        .child-table > .print-item-value{
                            margin: -1px;
                        }
                        .printer,.print-date{
                            padding-left: 60%;
                        }
                        .Image > .print-item-value > img{
                            max-width: 100%;
                            height: auto;
                        }
                    </style>
                </head>
                <body style="margin: 28px;">
                    <div class="head">
                        <h1 class="title">分页打印</h1>
                    </div>
                    <div class="table">
                        {{#each data}}
                            <div class='print-item String'>
                                <div class='print-item-label'>单行文本</div>
                                <div class='print-item-value'>{{[_deft_danxingwb}}]</div>
                            </div>
                            {{#if dbmdayin_1_deft_zb}}
                                <div class='print-item child-table'>
                                    <div class='print-item-label'>子表</div>
                                    <div class='print-item-value'>
                                        {{#each dbmdayin_1_deft_zb}}
                                            <div class='print-item Date'>
                                                <div class='print-item-label'>日期</div>
                                                <div class='print-item-value'>{{[_deft_riji}}]</div>
                                            </div>
                                        {{/each}}
                                    </div>
                                </div>
                            {{/if}}
                            <!--分页-->
                            <div class="PageNext"></div>
                        {{/each}}
                    </div>
                    <div class="footer">
                        <h4 class="printer">打印人:{{context.printer}}</h4>
                        <h4 class="print-date">打印时间:{{context.printDate}}</h4>
                    </div>
                </body>
            </html>
打印 echarts 图表
将 echarts 图表导出到 pdf,如下图所示
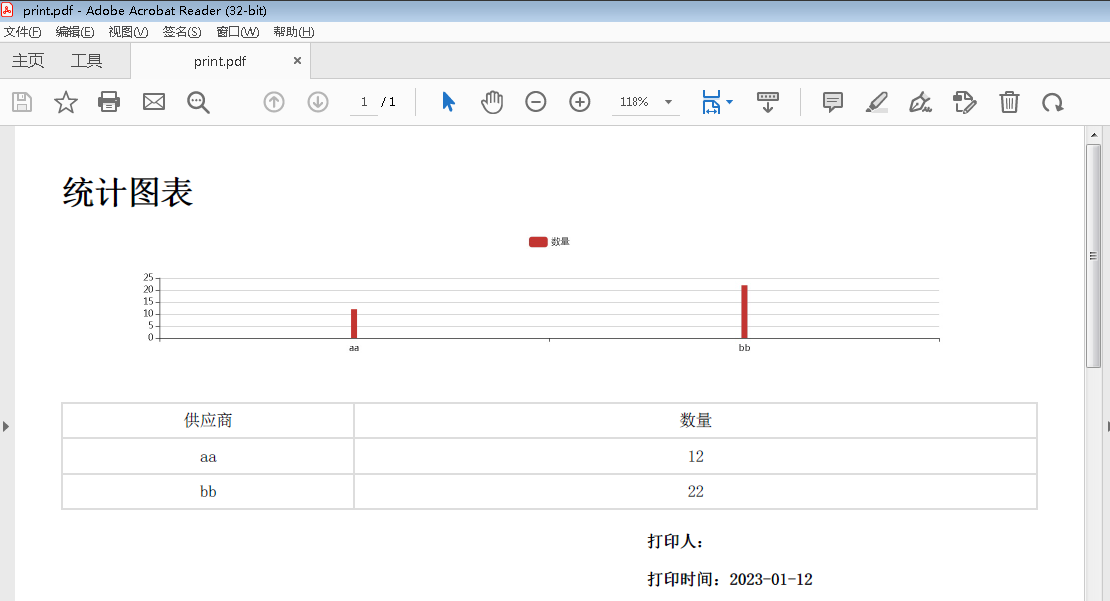
- 使用 echarts 的 getDataURL 方法获得图表的图片的 Base64 编码
- 使用打印组件打印 echarts 的图片
获得图表的图片的 Base64 编码
echarts 提供 getDataURL 方法,导出图表图片,返回一个 base64 的 URL,可以设置为 Image 的 src
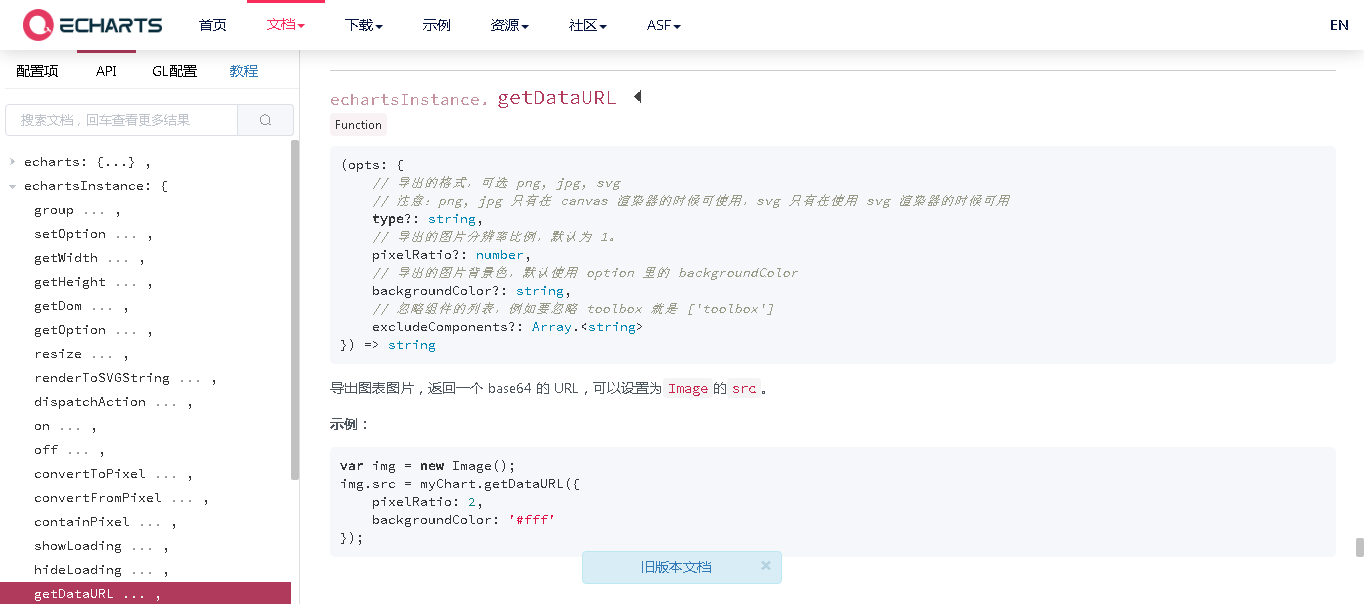
获取图表组件的 echarts 实例,调用 getDataURL 方法,获得图片的 Base64 编码
   //获取图表组件的 echarts 实例
   let myChart =  this.comp("echarts0").getEchartsInstance();
   //调用 getDataURL 方法,返回图片的 Base64 编码
   let picInfo = myChart.getDataURL({
      type: "png",
      pixelRatio: 1.5,
      backgroundColor: "white"
   });
添加自定义数据(给打印组件使用),增加 pic 列,用于存储图片的 Base64 编码
tableCustomData0.setValue("pic",picInfo);
使用打印组件打印图片
在页面上添加打印组件,在代码中添加打印组件的模板文件,本例在 UI2/pcx 目录下新建 chart.print.tpl 文件,在打印组件的附加数据属性中,选中自定义数据
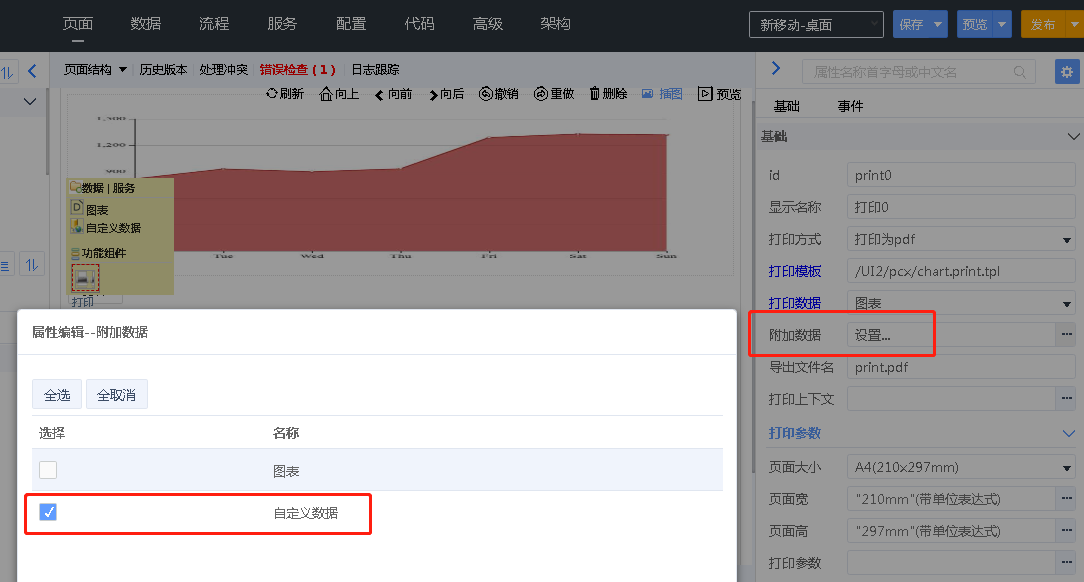
在打印模板中,使用 context.datas.data 组件 id 访问附加数据,data组件id.[0].colName 表示第一行 colName 列的数据。本例自定义数据组件的 id 为 tableCustomData0,列名为 pic,代码如下
   <style type="text/css">
      .Image > img{
         max-width: 100%;
         height: auto;
         margin-bottom: 20px;
      }
   </style>
   <div class="Image">
      <img src="{{context.datas.tableCustomData0.[0].pic}}"/>
   </div>
本例完整代码
js 代码如下
react 代码
    onPrintChartBtnClick(event){
        //获取图表组件的echarts实例
        let myChart = this.comp("echarts0").getEchartsInstance();
        //调用getDataURL方法,返回图片的Base64编码
        let picInfo = myChart.getDataURL({
            type: "png",
            pixelRatio: 1.5,
            backgroundColor: "white"
        });
        //存入自定义数据
        this.comp("tableCustomData0").setValue("pic",picInfo);
        //调用打印组件的打印方法
        this.comp("printChart").preview();
    }
vue 代码
let $page = usePage();
let tableCustomData0 = useData("tableCustomData0");
let onPrintChartBtnClick = (event) => {
    //获取图表组件的echarts实例
    let myChart = $page.comp("echarts0").getEchartsInstance();
    //调用getDataURL方法,返回图片的Base64编码
    let picInfo = myChart.getDataURL({
        type: "png",
        pixelRatio: 1.5,
        backgroundColor: "white"
    });
    //存入自定义数据
    tableCustomData0.setValue("pic",picInfo);
    //调用打印组件的打印方法
    $page.comp("printChart").preview();
}
打印模板如下
<html>
   <head>
      <meta charset="UTF-8">
      <title>统计图表</title>
      <style type="text/css">
         .head{
         }
         .footer {
         }
         .table {
            border: 1px solid #dddddd;
         }
         .print-item{
            display: table-row;
            page-break-inside: avoid;
         }
         .print-item > .print-item-label,
         .print-item > .print-item-value{
            border: 1px solid #dddddd;
            padding: 8px;
            display: table-cell;
            text-align: center;
         }
         .print-item > .print-item-label{
            width: 30%;
            vertical-align: middle;
         }
         .table{
            padding: 0;
            border-collapse: collapse;
            border-spacing: 0;
            width: 100%;
            display: table;
         }
         .printer,.print-date{
            padding-left: 60%;
         }
         .Image > img{
            max-width: 100%;
            height: auto;
            margin-bottom: 20px;
         }
      </style>
   </head>
   <body style="margin: 28px;">
      <div class="head">
         <h1 class="title">统计图表</h1>
      </div>
      <div class='print-item String'>
      <div class="Image">
        <img src="{{context.datas.tableCustomData0.[0].pic}}"/>
      </div>
      <div class="table">
         <div class='print-item String'>
            <div class='print-item-label'>供应商</div>
            <div class='print-item-value'>数量</div>
         </div>
         {{#each data}}
            <div class='print-item String'>
               <div class='print-item-label'>{{{fgongyings}}}</div>
               <div class='print-item-value'>{{{fshuoliang}}}</div>
            </div>
         {{/each}}
      </div>
      <div class="footer">
         <h4 class="printer">打印人:{{context.printer}}</h4>
         <h4 class="print-date">打印时间:{{context.printDate}}</h4>
      </div>
   </body>
</html>
测试打印模板文件
打印模板是使用 Handlebars 创建的语义模板,网上有很多测试 Handlebars 模板的网站,例如:https://handlebarsjs.com/playground.html,输入打印模板和数据,检验模板的正确性,以及查看运行效果
数据可以从打印操作的请求中获取,调用打印操作时,系统发送file请求。在浏览器中打开开发人员工具,在 network 中查看 file 请求
下面是发送内容
{
    "type": "pdf",
    "template": "/UI2/mobile/dayin.w.print.tpl",
    "rows": [
        {
            "fid": "C8D60FEE42B0000187F35C5719EDF9A0",
            "_deft_duoxingwb": "22",
            "_deft_danxingwb": "11",
            "fcreateDate": ""
        }
    ],
    "context": {
        "printer": "system",
        "printDate": "2020-03-20",
        "datas": {
            "restData1": [
                {
                    "fid": "C8D60BAFC7800001FE511DE0790010E9",
                    "name": "一体机"
                },
                {
                    "fid": "C8D60BB1CF000001DD9CD68016881849",
                    "name": "笔记本"
                }
            ]
        }
    }
}
其中
- rows 是“打印数据”属性对应的数据集中的数据,如果有从表,会包括从表数据
- context.datas 是“附加数据”属性包括的数据集中的数据
测试打印模板时,数据为
{
    "data": [
        {
            "fid": "C8D60FEE42B0000187F35C5719EDF9A0",
            "_deft_duoxingwb": "22",
            "_deft_danxingwb": "11",
            "fcreateDate": ""
        }
    ],
    "context": {
        "printer": "system",
        "printDate": "2020-03-20",
        "datas": {
            "restData1": [
                {
                    "fid": "C8D60BAFC7800001FE511DE0790010E9",
                    "name": "一体机"
                },
                {
                    "fid": "C8D60BB1CF000001DD9CD68016881849",
                    "name": "笔记本"
                }
            ]
        }
    }
}