平台 OAuth2.0 认证服务
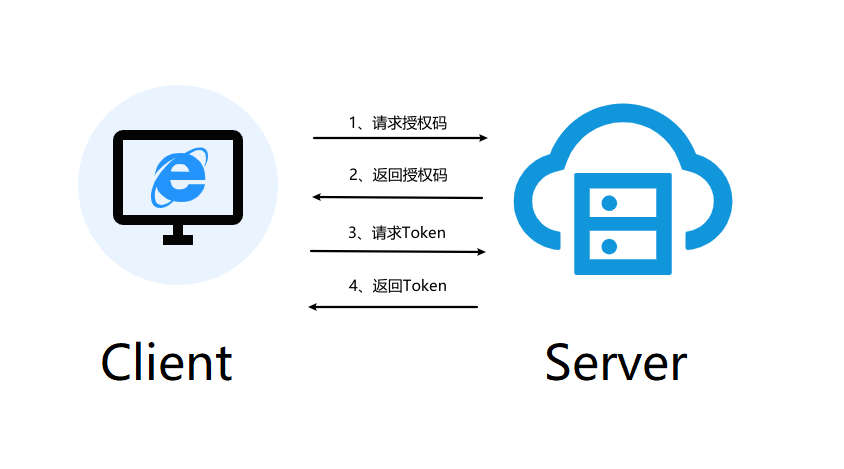
OAuth 2.0 是目前最流行的授权机制,用来授权第三方应用,获取用户数据。OAuth2.0 标准授权步骤,Server 端向 Client 端下放 Code 码,Client 端再用 Code 码换取授权 Token。如下图:
平台“企业集成”应用提供了 OAuth 2.0 认证服务,支持平台应用或第三方应用作为客户端,访问认证服务。
同时,平台提供了客户端模板文件 sso-client.zip,用于访问认证服务。放在平台应用中只需简单配置即可使用。
认证服务
平台通过企业集成的模块 oauth2 提供认证服务,原理实现参考 Sa-Token

表结构信息
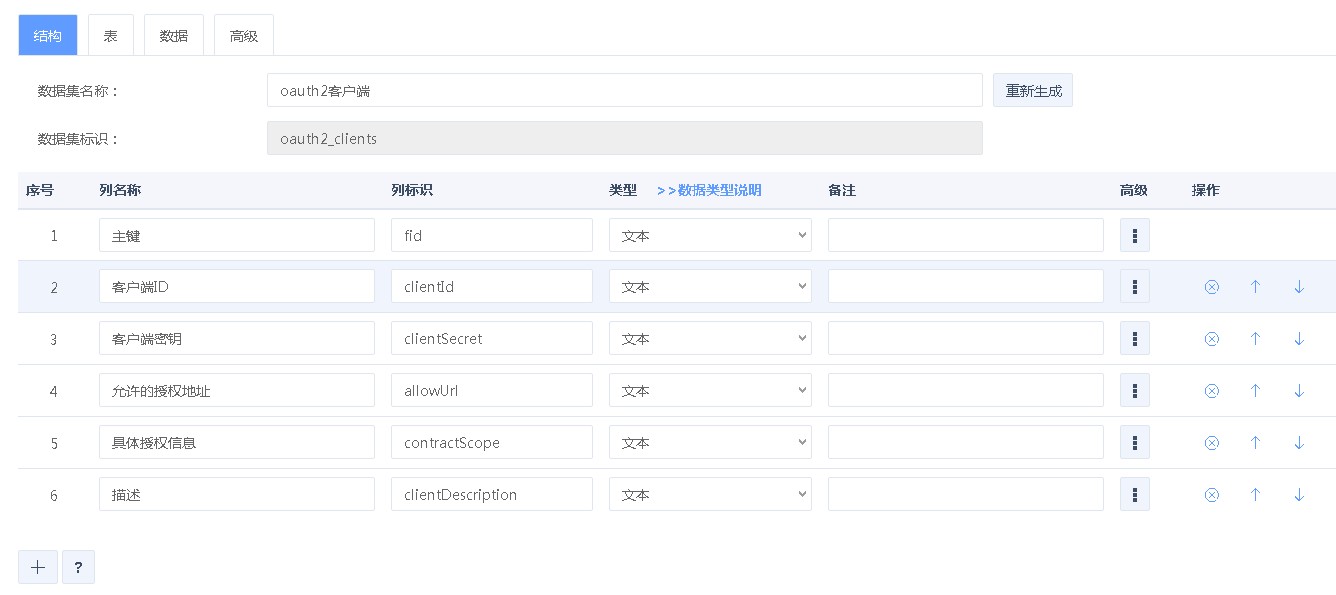
客户端信息表
客户端信息表用来配置需要进行 OAuth2.0 认证的第三方应用。其中允许的授权地址、具体授权信息字段可配置多个,多个情况使用英文逗号分隔。
配置数据如下:

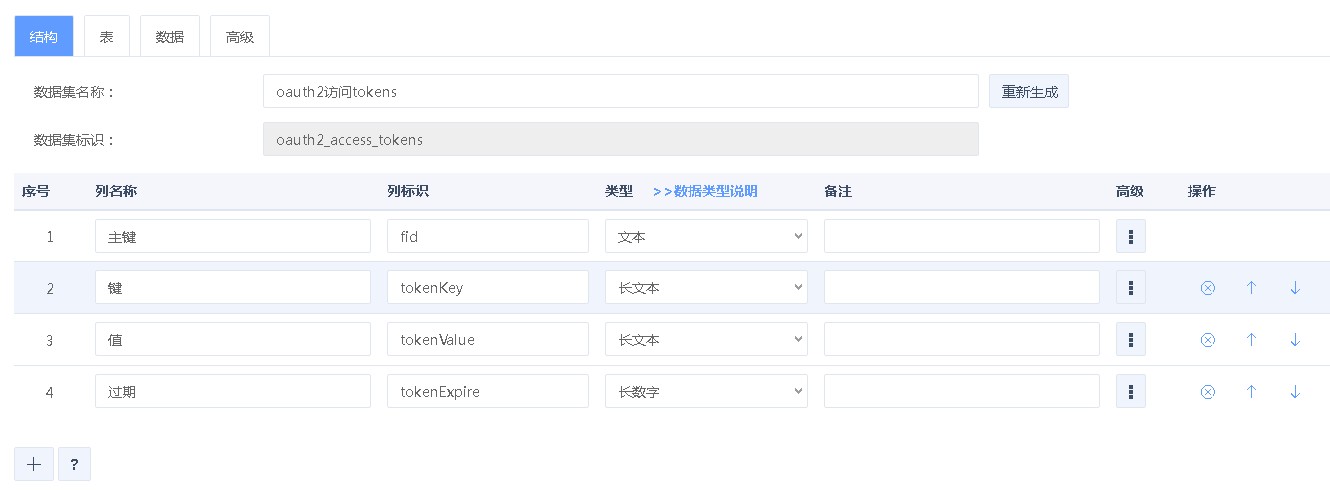
会话数据表
会话数据表主要用来记录 OAuth2.0 认证过程的缓存数据。
配置客户端
企业集成应用提供“认证客户端”,用来添加客户端。客户端 ID 和客户端密钥在访问认证服务中使用

API 接口
| 接口名称 | 接口地址 | 请求方法 |
|---|---|---|
| well-known | oauth2/.well-known/openid-configuration | GET |
| 认证 | oauth2/api/authorize | GET |
| 登录 | oauth2/api/doLogin | POST |
| 授权 | oauth2/api/doConfirm | POST |
| token 获取 | oauth2/api/token | POST |
| token 刷新 | oauth2/api/refresh | POST |
| token 回收 | oauth2/api/revoke | POST |
| 用户信息 | oauth2/userinfo | POST |
| 登出 | oauth2/logout | GET |
认证
URL:
    https://门户域名/integration/oauth2/api/authorize?response_type=code&client_id=xxx&scope=userinfo&redirect_uri=xxx
参数:
    门户域名:使用租户中企业门户的域名
    response_type:固定参数 code,表示授权码模式
    client_id:在认证客户端中设置的客户端 iD
    scope:在认证客户端中设置的具体授权信息
    redirect_url:登录成功后的重定向地址,下发授权码 code
使用客户端模板 sso-client.zip 时,重定向地址写为 https://门户域名/应用名/main/oauth/callback%3Flocation=/
- 重定向地址为:/main/oauth/callback
- %3F 为转义的 ?
- location 表示认证成功后打开的地址
获取 token
URL:
    https://门户域名/integration/oauth2/api/token?grant_type=authorization_code&client_id=xxx&client_secret=xxx&code=xxx
参数:
    门户域名:使用租户中企业门户的域名
    grant_type: 固定参数 authorization_code,表示授权码模式
    client_id:在认证客户端中设置的客户端 iD
    client_secret:在认证客户端中设置的客户端密钥
    code:下发的授权码
返回:
    access_token
获取用户信息
URL:
    https://门户域名/integration/oauth2/userinfo?access_token=xxx
参数:
    门户域名:使用租户中企业门户的域名
    access_token: 调用获取 token API 的返回值
认证过程
浏览器访问认证服务
https://门户域名/integration/oauth2/api/authorize?response_type=code&client_id=xxx&scope=userinfo&redirect_uri=xxx
显示认证服务登录页面,如下图所示,支持通过环境变量配置为其它页面

用户首次登录后,跳转到授权页面,如下图所示,支持通过环境变量配置为其它页面

登录成功后,跳转到重定向地址
客户端
使用平台认证服务进行登录验证的系统,称为客户端。可以是平台本身,也可以是第三方。
平台应用作为客户端
平台提供客户端模板文件 sso-client.zip 用于放到平台的应用中,只需配置几个内容,即可访问认证服务
- UI2/pcx/oauth2.user.serviceMetaInfo.json 文件用于设置认证回调接口为匿名访问
- service/main 目录下的文件提供认证回退接口
认证回调接口
认证服务重定向地址访问的是客户端模板文件中的 /main/oauth/callback 服务,代码如下,接收两个参数
- code: 认证服务下发的授权码
- location:重定向地址中携带的参数
    @RequestMapping(value = "/main/oauth/callback", method = RequestMethod.GET)
    public void oauthcallback(@RequestParam(name = "code") String code,@RequestParam(name = "location") String location) throws Exception {
        oauthProcessor.process(code, location);
    }
oauthcallback 方法的主执行链路,代码如下
- 通过 code 调用认证服务 API 获取 accessToken
- 通过 accessToken 调用认证服务 API 获取 userInfo
- 注册用户
- 用户登录
- 跳转到 location 参数指定的页面
    public void process(String code,String location) {
        if(StringUtils.isBlank(code)) {
            throw new IllegalArgumentException("oauth回调code不能为空!");
        }

        if(StringUtils.isBlank(location)) {
            throw new IllegalArgumentException("oauth登录的location不能为空!");
        }
        String accessToken = this.onRetriveAccessToken(code);
        U oauthUserInfo = this.onRetriveOauthUserInfo(accessToken);
        String session = null;
        if(this.checkNeedLogin(oauthUserInfo)) {
            String[] shadowUserLoginInfo = this.onRegisteUser(oauthUserInfo, oauthConfig);
            session = this.onLogin(shadowUserLoginInfo);
        }
        this.onProcessReponse(session, location);
        this.onOauthSuccess(oauthUserInfo,session);
    }
配置认证参数
在 java/main/config/OauthConfig.java 文件中配置认证参数
- clientId:在认证客户端中设置的客户端 iD
- clientSecret:在认证客户端中设置的客户端密钥
- oauthServer:认证服务地址,使用租户中企业门户的域名/integration
- redirectUri:认证回调地址,使用租户中企业门户的域名/应用名/main/oauth/callback,已在 oauth2.user.serviceMetaInfo.json 文件中设置为匿名访问
示例代码如下
    public String clientId = "1001";
    public String clientSecret = "aaaa-bbbb-cccc-dddd-eeee";
    public String oauthServer = "https://entryhlzs4-vip.h.xcaas.net/integration";
    public String redirectUri = "https://entryhlzs4-vip.h.xcaas.net/oauth2/main/oauth/callback";
第三方应用作为客户端
使用认证服务认证并登录,过程如下
- 访问认证服务,传入回调地址 redirect_uri
- 认证服务器验证通过后,重定向到 redirect_uri,同时携带授权码 code
- 使用 code 调用认证服务的接口,获取授权 token
- 使用授权 token,调用认证服务的接口,获取用户信息
- 系统根据用户信息,在系统中自动注册用户,完成登录,并重定向到要真正打开的地址
第三方应用可以参考平台提供的客户端模板文件中的 Java 部分,提供认证回调接口,在接口中获取用户信息,并实现登录跳转
自定义登录及授权页面
认证服务的登录和授权页面,可以通过企业集成的“环境变量”自定义。
添加登录和授权页面
页面中,登录和授权的 JS 代码,可以参考下面的代码
- 登录 JS 代码
//登录
onLoginBtnClick = async(event) => {
    const pageData=this.comp("pageData").getCurrentRow();
    let {response_type,client_id,redirect_uri,scope}=this.params;
    //认证服务地址
    const oauth2ServerUrl="https://entryhlzs4-vip.h.xcaas.net/integration";
    // 认证服务登录地址
    const loginUrl = '/oauth2/api/doLogin';
    try {
        const header={
            "accept": "application/json",
            // 要使用这个类型请求
            "content-type": "application/x-www-form-urlencoded"
        }
        const {data,statusCode}=await this.request({url:`${oauth2ServerUrl}/${loginUrl}?client_id=${client_id}`,header,method:"post",data:{name:pageData.username,pwd:pageData.password}});
        if(statusCode === 200 && data.code === 200){
            // 登录成功后继续认证
            window.location.href = oauth2ServerUrl+'/oauth2/api/authorize?response_type=' + response_type + "&client_id=" + client_id + "&redirect_uri=" + redirect_uri + "&scope=" + scope
        }else{
            message.error("登录失败!"+data.message);
        }
    } catch (error) {
        message.error("登录失败!");
        throw error;
    }

}
- 授权 JS 代码
//授权
onAuthBtnClick = async(event) => {
    //获取参数
    let {response_type,client_id,redirect_uri,scope}=this.params;
    //认证服务地址
    const oauth2ServerUrl="https://entryhlzs4-vip.h.xcaas.net/integration";
    //认证服务授权地址
    const authUrl="/oauth2/api/doConfirm";
    try {
        const header={
            "accept": "application/json",
            // 要使用这个类型请求
            "content-type": "application/x-www-form-urlencoded"
        }
        const {data,statusCode}=await this.request({url:`${oauth2ServerUrl}/${authUrl}`,header,method:"post",data:{client_id, scope}});
        if(statusCode === 200 && data.code === 200){
            // 登录成功后继续认证
            window.location.href = oauth2ServerUrl+'/oauth2/api/authorize?response_type=' + response_type + "&client_id=" + client_id + "&redirect_uri=" + redirect_uri + "&scope=" + scope
        }else{
            message.error("登录失败!"+data.message);
        }
    } catch (error) {
        message.error("登录失败!");
        throw error;
    }
}
设置页面匿名访问
通过 IDE 角色权限设置,设置“登录”及“授权”页面匿名访问


设置环境变量
将页面的访问地址,配置到企业集成-环境配置的登录视图、授权视图中
平台访问认证服务
认证服务
使用租户管理员登录后,在“应用服务管理”下新增“企业集成”应用,并到企业门户下进行服务注册


企业集成服务注册完成后,在门户“企业集成 -> OAuth2 -> 认证客户端”下新增客户端信息

客户端
在租户下“我的开发 -> 企业应用”下新增“SpringBootReact 空白模板”应用,作为访问认证服务的客户端。
- 使用本地 IDE,将 sso-client.zip 文件复制到应用中
- 使用云 IDE,参考《应用导入导出》中的通过 IDE 导入源码包,使用追加模式,导入 sso-client.zip


在 java/main/config/OauthConfig.java 文件中,修改认证配置参数:oauthServer、clientId、clientSecret、redirectUri

完成以上操作后,通过认证服务的认证接口“企业门户域名/integration/oauth2/api/authorize”进行访问即可,例如 https://entryhlzs4-vip.h.xcaas.net/integration/oauth2/api/authorize?response_type=code&client_id=1001&scope=userinfo&redirect_uri=https://entryhlzs4-vip.h.xcaas.net/main/oauth/callback%3Flocation=/