开发运维插件
快速入门
以开发一个 tolerations 插件为例
准备材料在 Linux 上试运行 kustomize
试运行的目的是了解平台运维插件的原理
事先准备
- 准备 Linux
- 安装k ustomize
# 1. 官方标准安装
https://kubectl.docs.kubernetes.io/installation/kustomize/binaries/

# 2. 内网安装
cd /usr/local/bin && \
    curl -s ftp://192.168.0.33:32121/builder/docker-bin-files/kustomize_v3.5.4_linux_$(arch).tar.gz --user builder:bld12345 -o /tmp/kustomize.tar.gz && \
    tar -xf /tmp/kustomize.tar.gz kustomize && \
    rm -f /tmp/kustomize.tar.gz
- kustomize 参考文档 https://kubectl.docs.kubernetes.io/installation/kustomize/
- JSONSchema FormRender 参考文档 https://xrender.fun/form-render
制作 yaml 文件并开发
- 任意一个应用,我们拷贝它的基础 Yaml,然后保存。如:base.yaml
- kustomize 制作:以 tolerations 能力为例如下 kustomization.yaml 所示
kustomization.yaml
yaml 语法都是严格的遵循 kustomize 官网 https://kubectl.docs.kubernetes.io/installation/kustomize/
resources:
- base.yaml

patches:
  - target:
      kind: Deployment
      name: plugin-deploy
    patch: |-
      apiVersion: apps/v1
      kind: Deployment
      metadata:
        name: plugin-deploy
      spec:
        template:
          spec:
            tolerations:
            - key: node-role.kubernetes.io/pool
              value: false
              effect: NoSchedule
              operator: Equal
- 把 base.yaml、kustomization.yaml 复制同一目录文件夹下
root@newdao:# ls
base.yaml  kustomization.yaml
- 在目录下执行命令查看验证所开发的 kustomize 结果
kustomize build .
抽取变量,实现动态 yaml
- 对 kustomization.yaml 进行变量抽取,目的是为了运行时动态替换,kustomization.yaml 示例如下:
# 这里的resources字段被平台特殊改造过,resources的使用方式可参考下方的《运维插件模板里resources植入baseYaml》
resources: []

patches:
  - target:
      kind: Deployment
      name: ${Deployment}
    patch: |-
      apiVersion: apps/v1
      kind: Deployment
      metadata:
        name: ${Deployment}
      spec:
        template:
          spec:
            tolerations:
            - key: ${tolerations_key}
              value: ${tolerations_value}
              effect: ${tolerations_effect}
              operator: ${tolerations_operator}
注: ${Deployment} 是系统变量,系统变量不需要在 JSONSchema 中配置,它会根据 base.yaml 读取 Deployment 的 name 自动进行抽取该 ${Deployment} 变量。
- 创建运维插件时拷贝到对应位置
JSONSchema FormRender 制作,给变量赋值
FormRender 官方文档 https://xrender.fun/form-render
如下:
// 唯一标识 deployment_tolerations
{
    "ui:labelWidth": 200,
    "type": "object",
    "properties": {
        "tolerations_key": {
            "title": "tolerations_key",
            "default": "node-role.kubernetes.io/pool",
            "type": "string"
        },
        "tolerations_value": {
            "title": "tolerations_value",
            "default": "false",
            "type": "string"
        },
        "tolerations_effect": {
            "title": "tolerations_effect",
            "default": "NoSchedule",
            "type": "string"
        },
        "tolerations_operator": {
            "title": "tolerations_operator",
            "default": "Equal",
            "type": "string"
        }
    }
}
创建运维插件时拷贝到对应位置
创建运维插件页面细节
- 以 system 账号系统管理员登录系统
- 集群管理——》运维插件管理
- 根据界面指导添加插件
- 配置项描述填入 JSONSchema FormRender,内容填入 kustomization.yaml
- 注:编码项是唯一标识,命名建议使用小写字母、数字、下划线
适用池模式: 语义就是单个应用池部署后也能使用运维插件,默认情况下运维插件在应用服务管理页中只有 kube 部署类型才能使用,因为部分运维插件作用后会导致应用解绑重新绑定,也就是池模式下应用重启导致网络波动。所以请慎用该选项。
种类编码: 是插件的分类标识,与《统一通用配置》——》《控制台ui》——》《运维插件场景配置》配合使用,作用于不同的页面场景。
制作后运维插件的成品
使用运维插件
作用于池管理
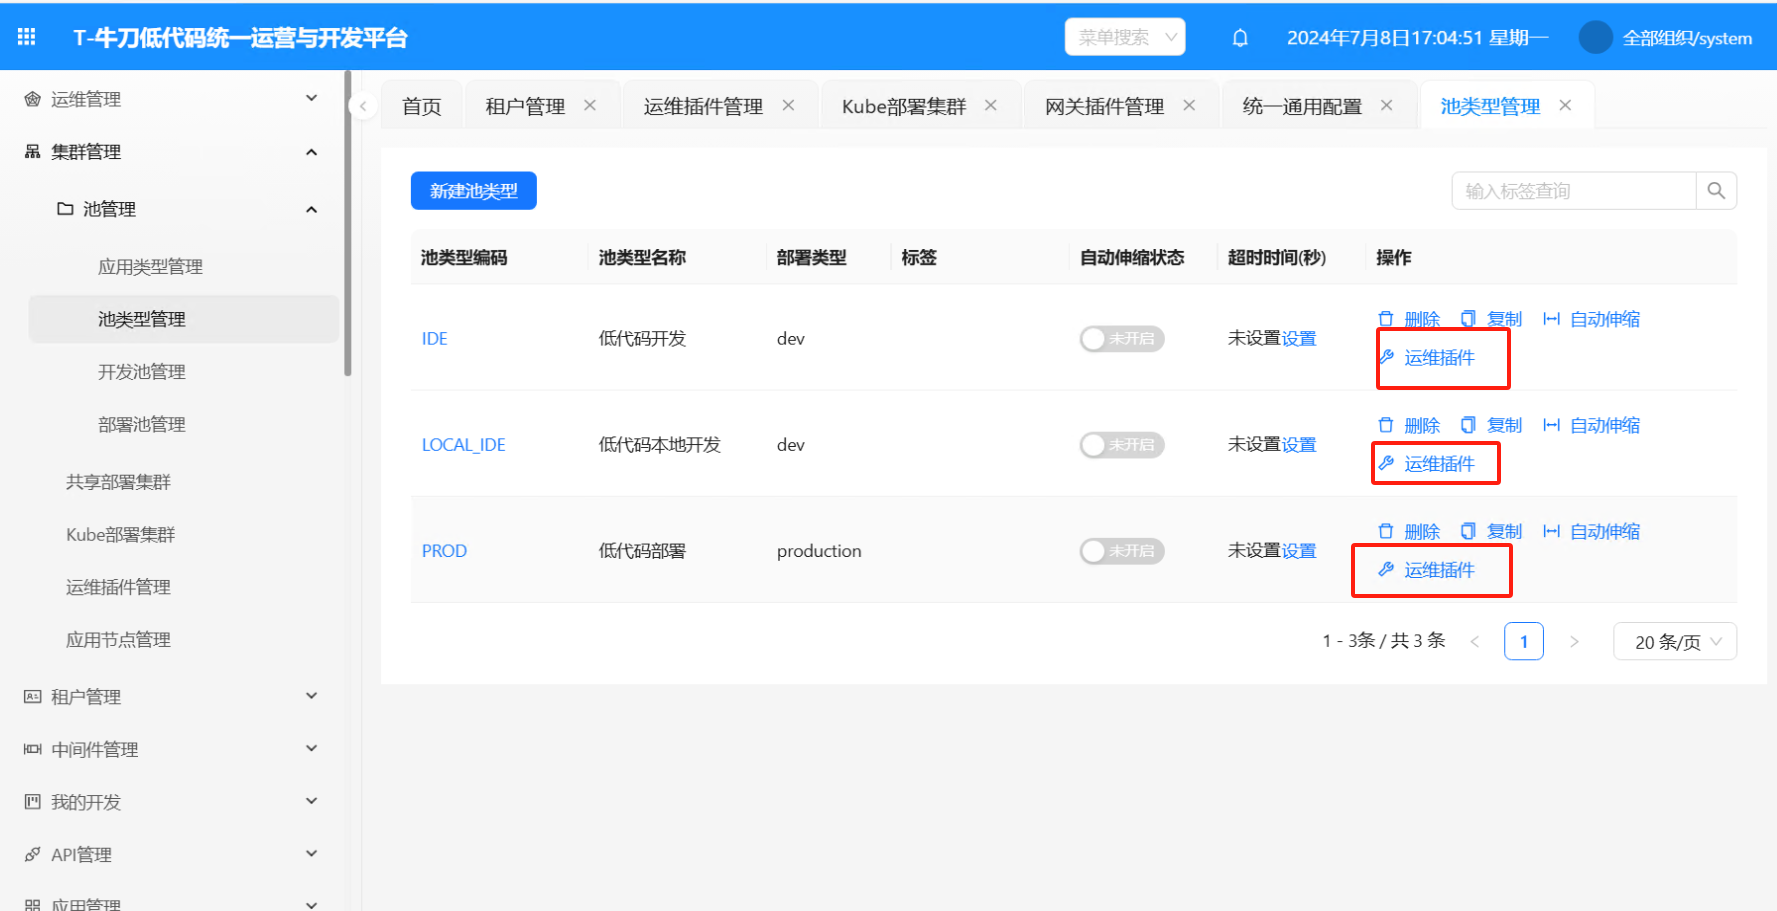
- system 账号系统管理员登录平台
- 进入集群管理——》池管理——》池类型管理——》运维插件
- 在运维插件配置页即可进行配置
- 配置确定后——》到池管理新增池即可生效
作用 kube 部署集群
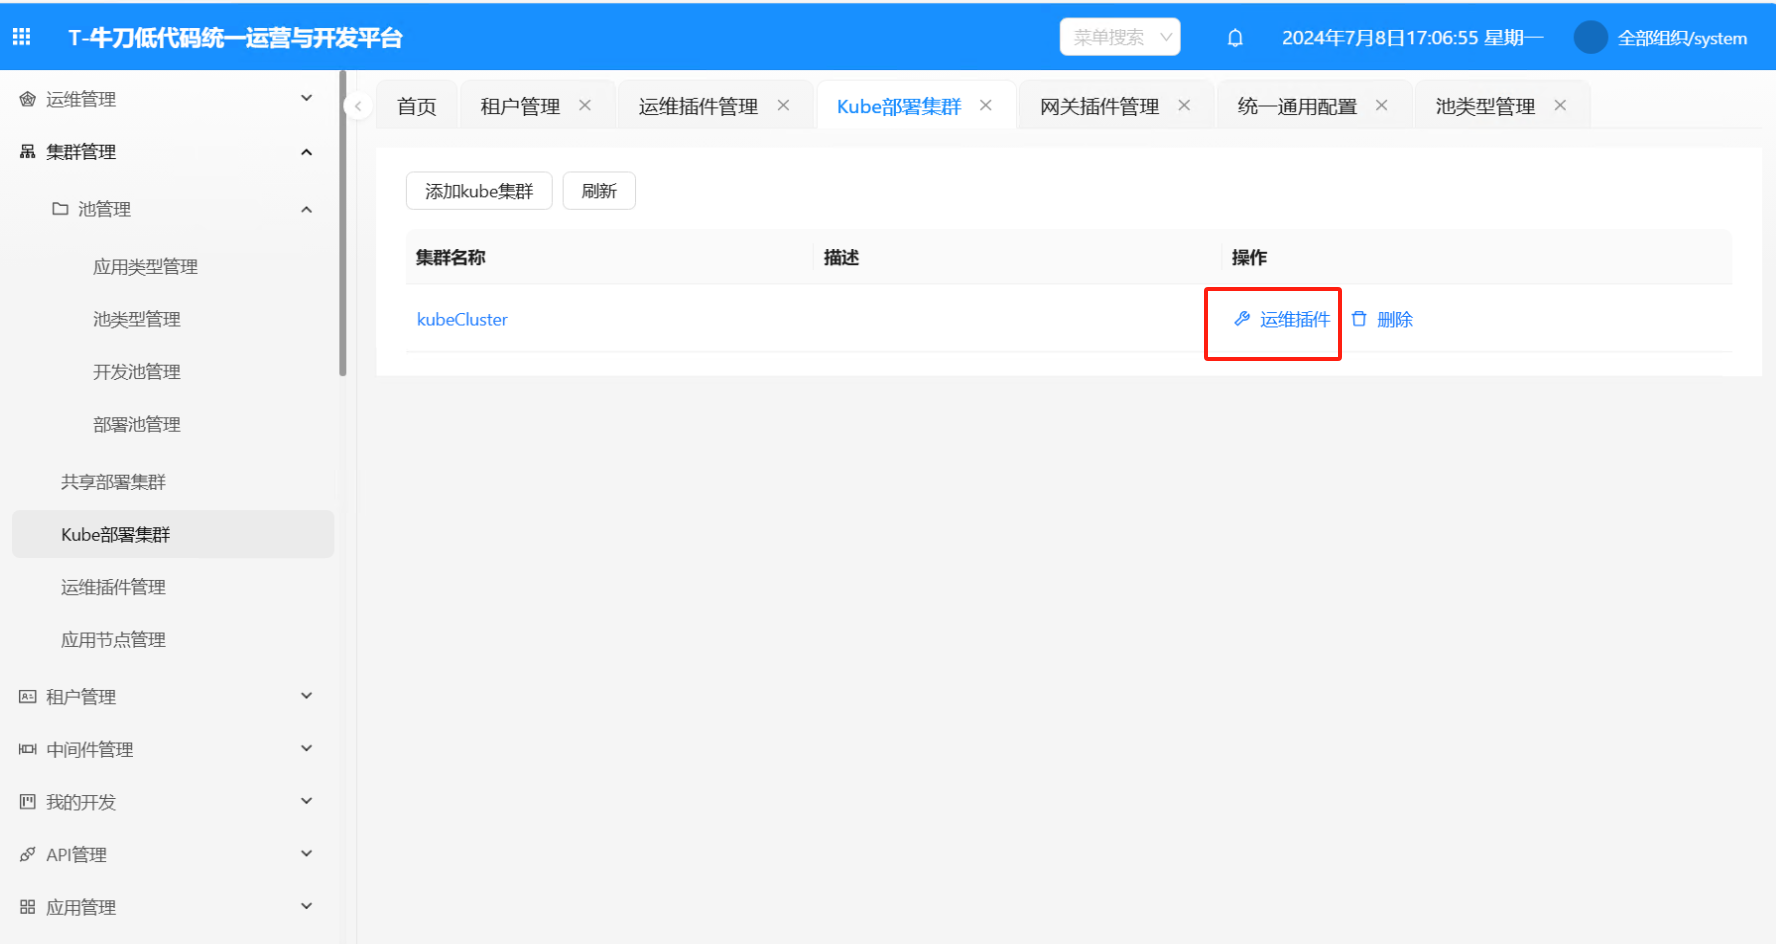
- system 账号系统管理员登录平台
- 集群管理——》kube 部署集群——》运维插件
- 在运维插件配置页即可进行配置
- 配置完成之后——》将该集群分配给相应的租户使用——》租户下进行应用部署时会把集群携带的运维插件传递赋给当前应用使用
作用于单个应用
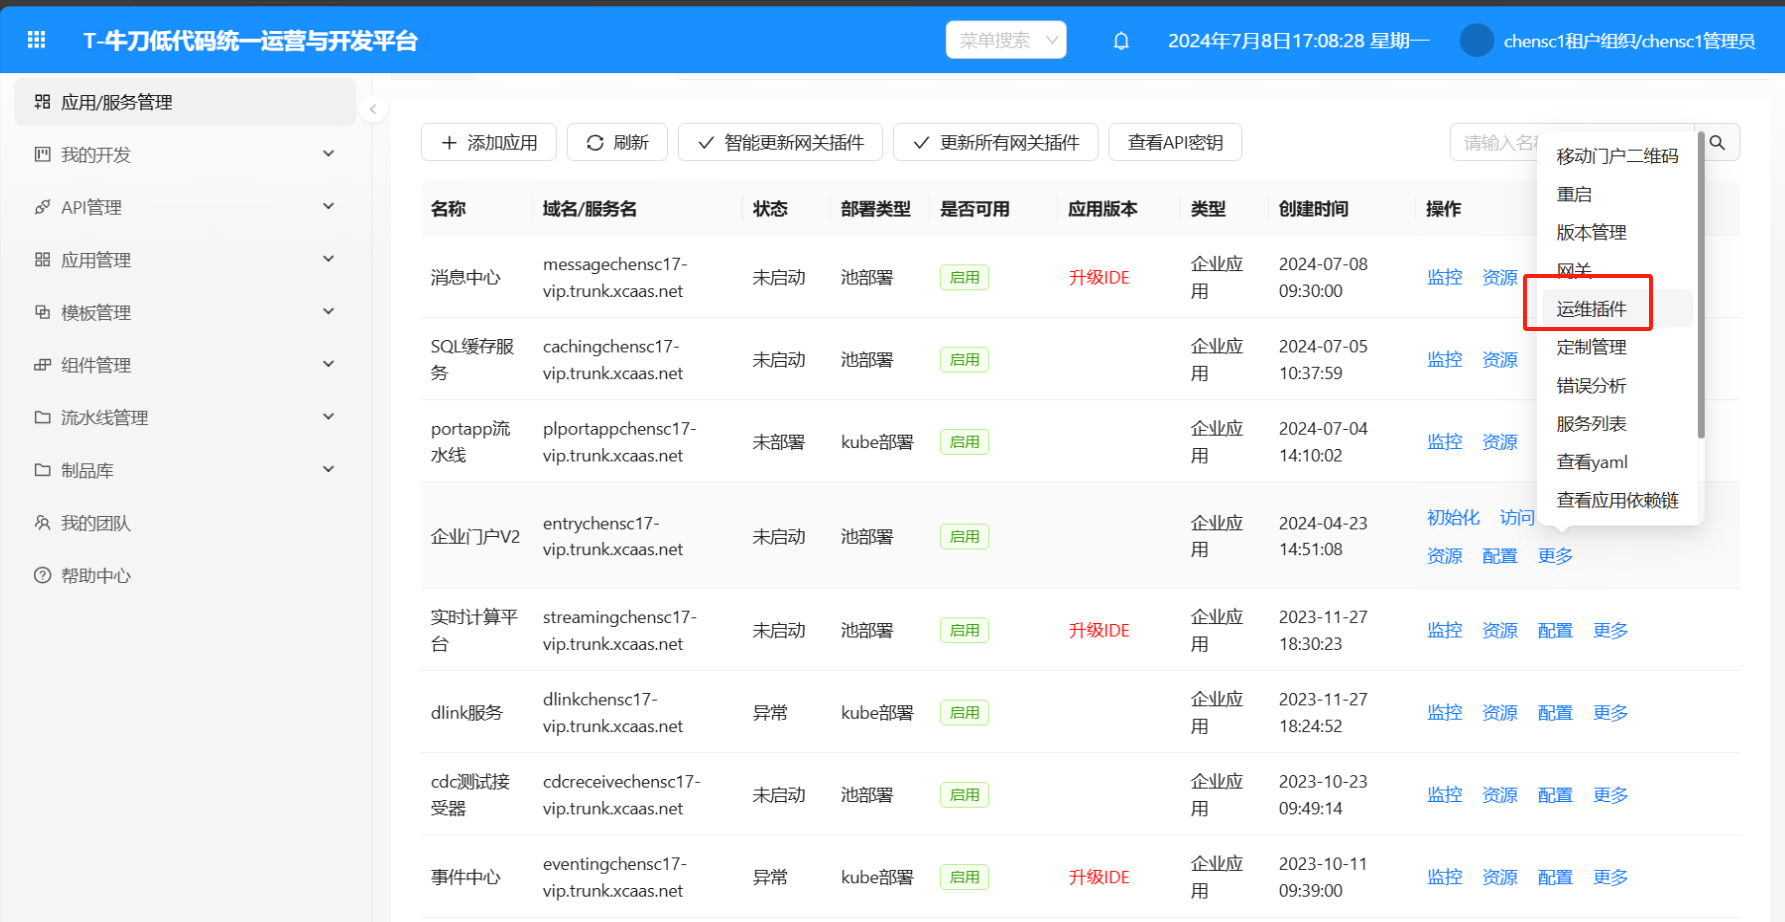
- 租户管理员登录平台
- 进入应用/服务管理——》找到应用——》点击更多按钮——》运维插件
- 在运维插件配置页即可进行配置
- 配置确定后——》点击生效运维插件
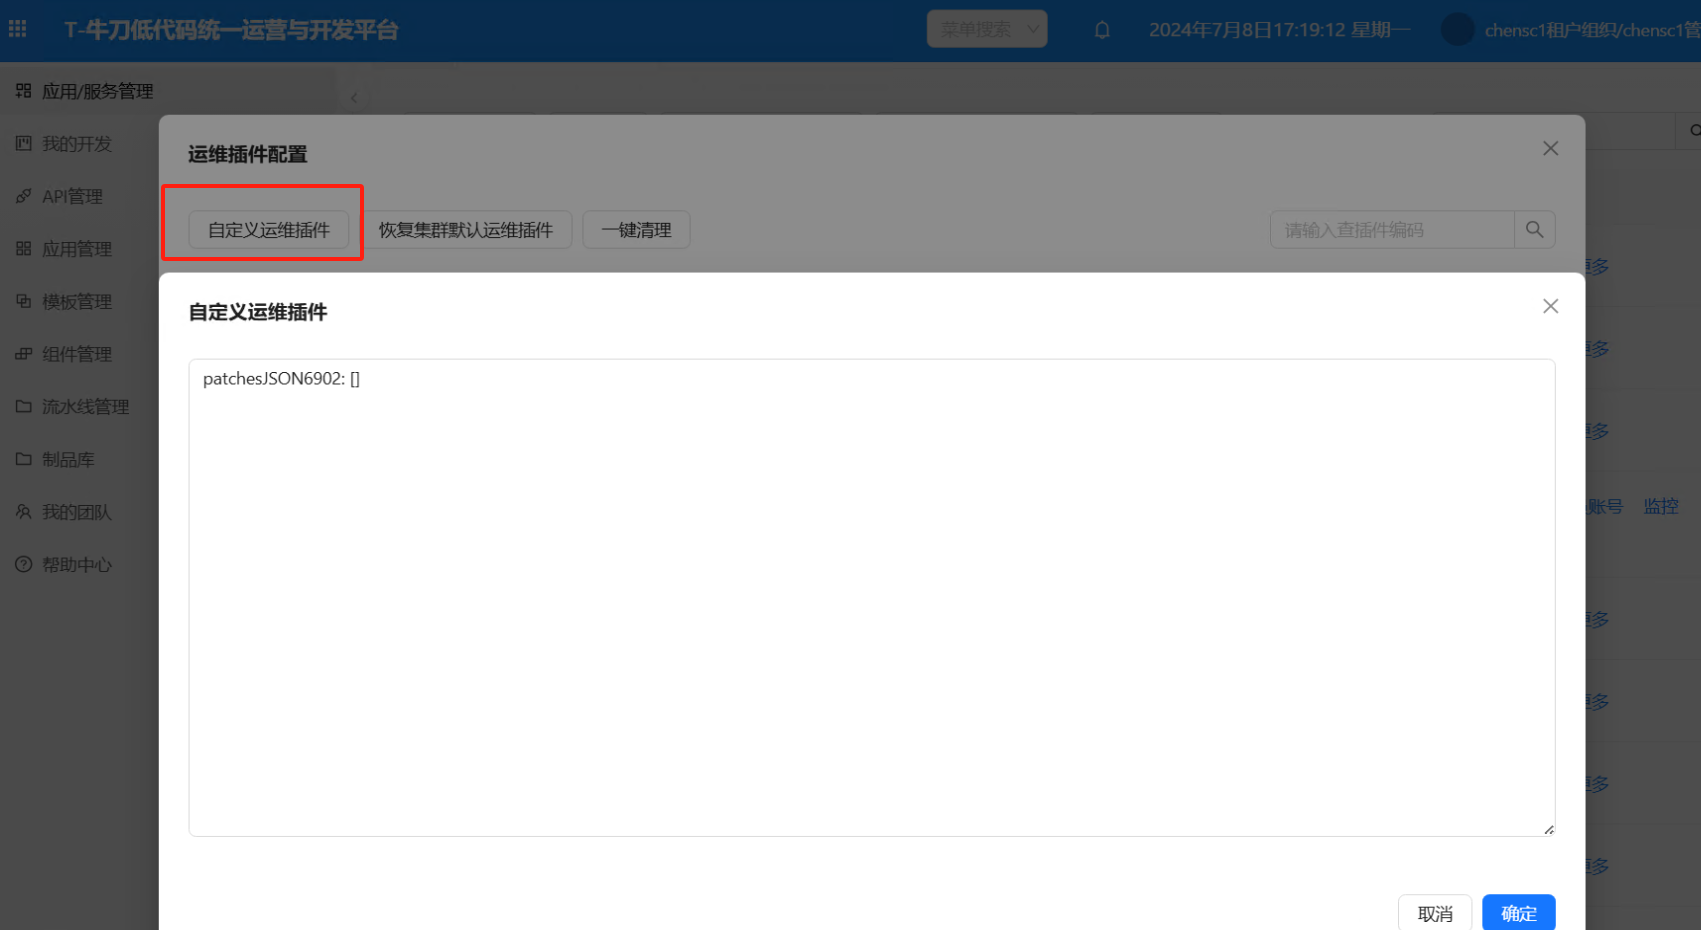
自定义运维插件: 用户可以对当前应用写自定义 kustomizehttps://kubectl.docs.kubernetes.io/installation/kustomize/,添加个性化的 yaml 片段。细节使用说明参考下面的“高级开发指南”中的“应用自定义 kustomization.yaml”
恢复集群默认运维插件: 恢复从 kube 集群携带过来运维插件配置值
验证
进入 k8s dashboard 界面,看对应的 yaml 是否生效
高级开发指南
kustomize Inline Patch 的应用
kustomize 补丁概述说明 https://kubectl.docs.kubernetes.io/guides/example/inline_patch/
patchesStrategicMerge——patch,不存在则创建,存在则覆盖
resources:
- base.yaml

patchesStrategicMerge:
- |-
  apiVersion: apps/v1
  kind: Deployment
  metadata:
    name: plugin-deploy
  spec:
    template:
      spec:
        tolerations:
        - key: node-role.kubernetes.io/pool
          value: false
          effect: NoSchedule
          operator: Equal
patchesStrategicMerge——delete,删除
resources:
- base.yaml

patchesStrategicMerge:
- |-
  apiVersion: apps/v1
  kind: Deployment
  metadata:
    name: plugin-deploy
  spec:
    template:
      spec:
        volumes:
        - name: model-cache-volume
          $patch: delete
patchesStrategicMerge——replace,替换
resources:
- base.yaml

patchesStrategicMerge:
- |-
  apiVersion: apps/v1
  kind: Deployment
  metadata:
    name: plugin-deploy
  spec:
    template:
      spec:
        volumes:
        - name: model-cache-volume
          hostPath:
            path: /model-cache-xxxx
            $patch: replace
PatchesJson6902 ,Patches json 占位替换
resources:
- base.yaml

patchesJSON6902:
- target:
    group: apps
    version: v1
    kind: Deployment
    name: plugin-deploy
  patch: |-
    - op: replace
      path: /spec/template/spec/tolerations
      value: []
    - op: replace
      path: /spec/template/spec/containers/0/image
      value: justep/app-init:1.0
Patches ,创建覆盖(推荐使用)
resources:
- base.yaml

patches:
  - target:
      kind: Deployment
      name: plugin-deploy
    patch: |-
      apiVersion: apps/v1
      kind: Deployment
      metadata:
        name: plugin-deploy
      spec:
        template:
          spec:
            tolerations:
            - key: node-role.kubernetes.io/pool
              value: false
              effect: NoSchedule
              operator: Equal
系统变量
系统变量不需要在 JSONSchema 中配置,它会根据 base.yaml 读取对应选项自动进行抽取该 ${var} 变量。
* ${Deployment}、${Deployment[0]}、${Deployment[1]}    是kind=Deployment的name的值作为系统变量,从base.yaml中提取。
  * ${Deployment[n]}里的n指的是在base.yaml中Deployment集合对应的index
  * ${Deployment} 取值Deployment集合中最后一个index
* ${Service}、${Service[0]}、${Service[1]}    是kind=Service的name的值作为系统变量,从base.yaml中提取
* ${namespace}、${namespace[0]}、${namespace[1]}    是从base.yaml中提取的namespace的值作为系统变量
* ${ConfigMap}、${ConfigMap[0]}、${ConfigMap[1]}    是kind=ConfigMap的name的值作为系统变量,从base.yaml中提取
* ${StatefulSet}、${StatefulSet[0]}、${StatefulSet[1]}    是kind=StatefulSet的name的值作为系统变量,从base.yaml中提取
* ${DeviceModel}、${DeviceModel[0]}、${DeviceModel[1]}    是kind=DeviceModel的name的值作为系统变量,从base.yaml中提取
* ${Device}、${Device[0]}、${Device[1]}    是kind: Device的name的值作为系统变量,从base.yaml中提取
* ${RuleEndpoint}、${RuleEndpoint[0]}、${RuleEndpoint[1]}    是kind=RuleEndpoint的name的值作为系统变量,从base.yaml中提取
* ${Rule}、${Rule[0]}、${Rule[1]}    是kind: Rule的name的值作为系统变量,从base.yaml中提取
* ${Ingress}、${Ingress[0]}、${Ingress[1]}    是kind: Ingress的name的值作为系统变量,从base.yaml中提取
* ${Secret}、${Secret[0]}、${Secret[1]}    是kind: Secret的name的值作为系统变量,从base.yaml中提取
* ${HorizontalPodAutoscaler}、${HorizontalPodAutoscaler[0]}、${HorizontalPodAutoscaler[1]}    是kind: HorizontalPodAutoscaler的name的值作为系统变量,从base.yaml中提取
应用自定义 kustomization.yaml
注:只能使用系统变量
# 以制作一个resources运维插件为例

patches:
  - target:
      kind: Deployment
      name: ${Deployment}
    patch: |-
      apiVersion: apps/v1
      kind: Deployment
      metadata:
        name: ${Deployment}
      spec:
        template:
          spec:
            containers:
            - name: tomcat
              resources:
                requests:
                  cpu: 1
                  memory: 1Gi
                limits:
                  cpu: 2
                  memory: 2Gi
            - name: java-runtime
              resources:
                requests:
                  cpu: 1
                  memory: 1Gi
                limits:
                  cpu: 2
                  memory: 2Gi
运维插件模板里 resources 植入baseYaml(以 ingress 插件为例)
制作 kustomize
# kustomization.yaml contents
resources:
  - kind: Ingress
    apiVersion: extensions/v1beta1
    metadata:
      name: ${ingress_name}-ingress
      namespace: ${tenant_namespace}
      annotations:
        kubernetes.io/ingress.class: nginx
        nginx.ingress.kubernetes.io/affinity: cookie
        nginx.ingress.kubernetes.io/proxy-body-size: 8g
        nginx.ingress.kubernetes.io/proxy-connect-timeout: '6000'
        nginx.ingress.kubernetes.io/proxy-read-timeout: '30000'
        nginx.ingress.kubernetes.io/proxy-send-timeout: '30000'
        nginx.ingress.kubernetes.io/session-cookie-expires: '172800'
        nginx.ingress.kubernetes.io/session-cookie-max-age: '172800'
        nginx.ingress.kubernetes.io/session-cookie-name: route
    spec:
      tls:
        - hosts:
            - entrychensc6-vip.dev.xcaas.net
          secretName: dev-xcaas-net
      rules:
        - host: entrychensc6-vip.dev.xcaas.net
          http:
            paths:
              - path: /
                pathType: ImplementationSpecific
                backend:
                  serviceName: entry
  - kind: Secret
    apiVersion: v1
    metadata:
      name: ${ingress_name}-ingress-secret
      namespace: ${tenant_namespace}
    data:
      tls.crt: >-
        LS0tLS1CRUdJTiBDRVJUSUZJQ0FURS0tLS0tCk1JSUZNVENDQkJtZ0F3SUJBZ0lTQk1SZUtaUDlFOHgwRlNPdHNPeXk
      tls.key: >-
        LS0tLS1CRUdJTiBQUklWQVRFIEtFWS0tLS0c9Ci0tLS0tRU5EIFBSSVZBVEUgS0VZLS0tLS0K
    type: kubernetes.io/tls

patches:
  - target:
      kind: Ingress
      name: ${Ingress}
    patch: |-
      kind: Ingress
      apiVersion: extensions/v1beta1
      metadata:
        name: ${Ingress}
        annotations:
          kubernetes.io/ingress.class: ${ingress_class}
          nginx.ingress.kubernetes.io/affinity: ${affinity}
          nginx.ingress.kubernetes.io/proxy-body-size: ${proxy_body_size}
          nginx.ingress.kubernetes.io/proxy-connect-timeout: ${proxy_connect_timeout}
          nginx.ingress.kubernetes.io/proxy-read-timeout: ${proxy_read_timeout}
          nginx.ingress.kubernetes.io/proxy-send-timeout: ${proxy_send_timeout}
          nginx.ingress.kubernetes.io/session-cookie-expires: ${session_cookie_expires}
          nginx.ingress.kubernetes.io/session-cookie-max-age: ${session_cookie_max_age}
          nginx.ingress.kubernetes.io/session-cookie-name: ${session_cookie_name}
      spec:
        tls:
          - hosts:
              - ${host}
            secretName: ${secret_name}
        rules:
          - host: ${host}
            http:
              paths:
                - path: /
                  pathType: ImplementationSpecific
                  backend:
                    serviceName: ${service_name}
  - target:
      kind: Secret
      name: ${Secret}
    patch: |-
      kind: Secret
      apiVersion: v1
      metadata:
        name: ${Secret}
      data:
        tls.crt: >-
          ${tls_crt}
        tls.key: >-
          ${tls_key}
制作 JSONSchema 前端渲染页面
// 唯一标识 ingress

{
    "ui:labelWidth": 200,
    "type": "object",
    "properties": {
        "ingress_class": {
            "title": "kubernetes.io/ingress.class",
            "default": "nginx",
            "type": "string"
        },
    "affinity": {
            "title": " nginx.ingress.kubernetes.io/affinity",
            "default": "cookie",
            "type": "string"
        },
        "proxy_body_size": {
            "title": "nginx.ingress.kubernetes.io/proxy-body-size",
            "default": "8g",
            "type": "string"
        },
    "proxy_connect_timeout": {
            "title": "nginx.ingress.kubernetes.io/proxy-connect-timeout",
            "default": "6000",
            "type": "string"
        },
    "proxy_read_timeout": {
            "title": "nginx.ingress.kubernetes.io/proxy-read-timeout",
            "default": "30000",
            "type": "string"
        },
    "proxy_send_timeout": {
            "title": "nginx.ingress.kubernetes.io/proxy-send-timeout",
            "default": "8g",
            "type": "string"
        },
    "session_cookie_expires": {
            "title": "nginx.ingress.kubernetes.io/session-cookie-expires",
            "default": "172800",
            "type": "string"
        },
    "session_cookie_max_age": {
            "title": "nginx.ingress.kubernetes.io/session-cookie-max-age",
            "default": "172800",
            "type": "string"
        },
    "session_cookie_name": {
            "title": "nginx.ingress.kubernetes.io/session-cookie-name",
            "default": "route",
            "type": "string"
        },
    "host": {
            "title": "外部域名",
            "default": "entry-vip.dev.xcaas.net",
            "type": "string"
        },
    "secret_name": {
            "title": "证书secret名称",
            "default": "",
            "type": "string"
        },
    "service_name": {
            "title": "ingress所映射的服务名",
            "default": "",
            "type": "string"
        },
    "ingress_name": {
            "title": "ingress name",
            "default": "",
            "type": "string"
        },
    "tenant_namespace": {
            "title": "租户namespace",
            "default": "",
            "type": "string"
        },
        // 以下是证书
    "tls_crt": {
            "title": "证书tls crt",
            "default": "",
            "type": "string"
        },
    "tls_key": {
            "title": "证书tls key",
            "default": "",
            "type": "string"
        }
    }
}
最终形成的 ops_plugin
{
    "plugins": [{
        "name": "ingress",
        "label": "ingress",
        "config": {
            "ingress_class": "ingress",
            "affinity": "cookie",
            "proxy_body_size": "8g",
            "proxy_connect_timeout": "6000",
            "proxy_read_timeout": "30000",
            "proxy_send_timeout": "30000",
            "session_cookie_expires": "172800",
            "session_cookie_max_age": "172800",
            "session_cookie_name": "route",
            "host": "www.xcas.com",
            "secret_name": "dev-xcaas-net",
            "service_name": "entry",
            "tls_crt": "ehfdjjfk",
            "tls_key": "djfk,df",
            "ingress_name": "entry",
            "tenant_namespace": "newdao-tenant-chensc"
        },
        "enabled": true
    }],
    "pluginsMd5": "jdifjkdifjmsdfm"
}
集合形式动态补丁 yaml 片段(以环境变量追加为例)
主要特性:kustomize 中的 container_name 和 JSONSchema 中使用集合的标识 items
kustomize
patches:
  - target:
      kind: Deployment
      name: ${Deployment}
    patch: |-
      apiVersion: apps/v1
      kind: Deployment
      metadata:
        name: ${Deployment}
      spec:
        template:
          spec:
            containers:
            # 容器名container_name被平台特殊加强过,枚举选项页会随着JSONSchema中的enum变化而变化
            - name: ${container_name}
              env:
                - name: ${ENV_NAME}
                  value: '${ENV_VALUE}'
formRender JSONSchema
{
    "type": "object",
    "properties": {
        "container_name": {
            "title": "容器名",
            "type": "string",
            "enum": [
                "app-init",
                "gateway",
                "tomcat",
                "java-runtime",
                "node-runtime"
            ],
            "enumNames": [
                "app-init",
                "gateway",
                "tomcat",
                "java-runtime",
                "node-runtime"
            ],
            "widget": "select"
        },
        // 使用集合这里必须用items字段来定义
        "items": {
            "ui:labelWidth": 200,
            "title": "环境变量",
            "description": "集合",
            "type": "array",
            "min": 1,
            "items": {
                "type": "object",
                "properties": {
                    "ENV_NAME": {
                        "title": "变量名",
                        "type": "string"
                    },
                    "ENV_VALUE": {
                        "title": "变量值",
                        "type": "string"
                    }
                }
            }
        }
    }
}
note
- 变量命名,无论是 yaml 还是 JSONSchema 采用的特殊字符建议是 - 或 _
- yaml 中包含密码,如果包含很多特殊字符的,建议使用 ' ' 进行包裹