页面模板开发
什么是页面模板
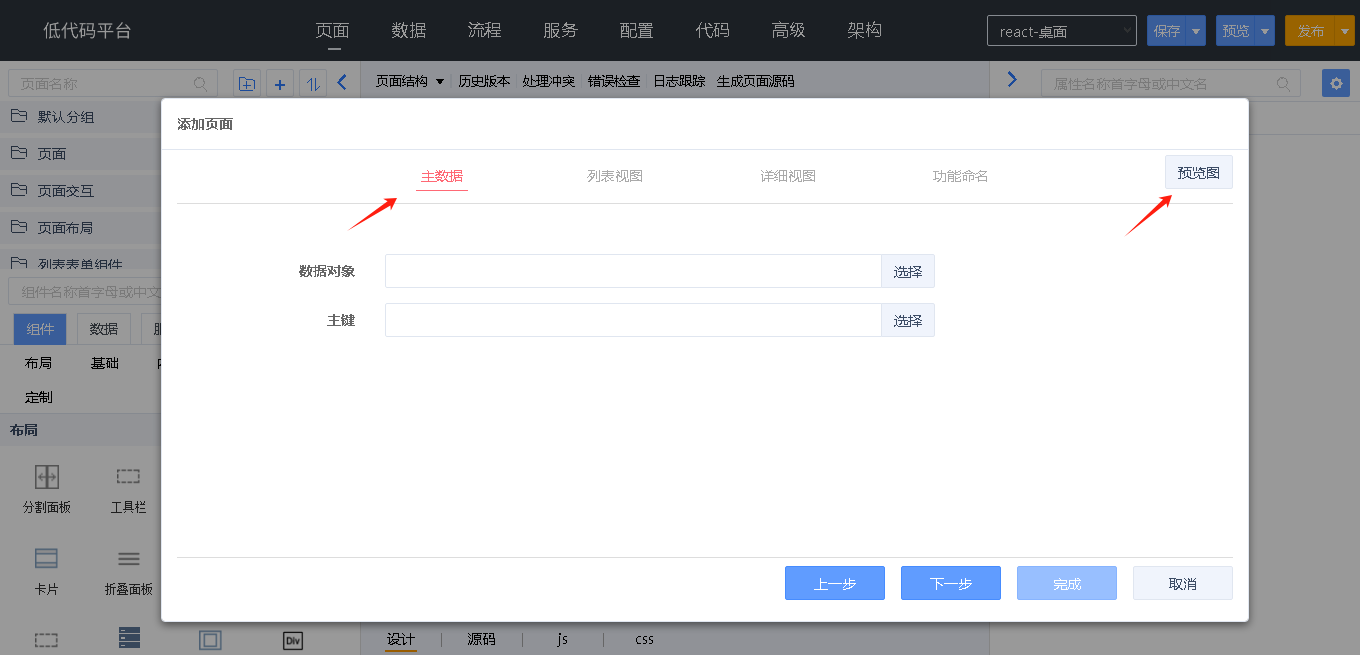
页面模板用于创建页面,根据模板的配置,可生成出不同的页面。系统提供一些常用的页面模板,例如:列表详情、列表单选、列表多选、树形表单、树形单选、树形多选、单表流程、主从流程等,如下图所示。新建页面时,选择一个页面模板,打开页面创建向导,里面显示页面模板中配置的内容
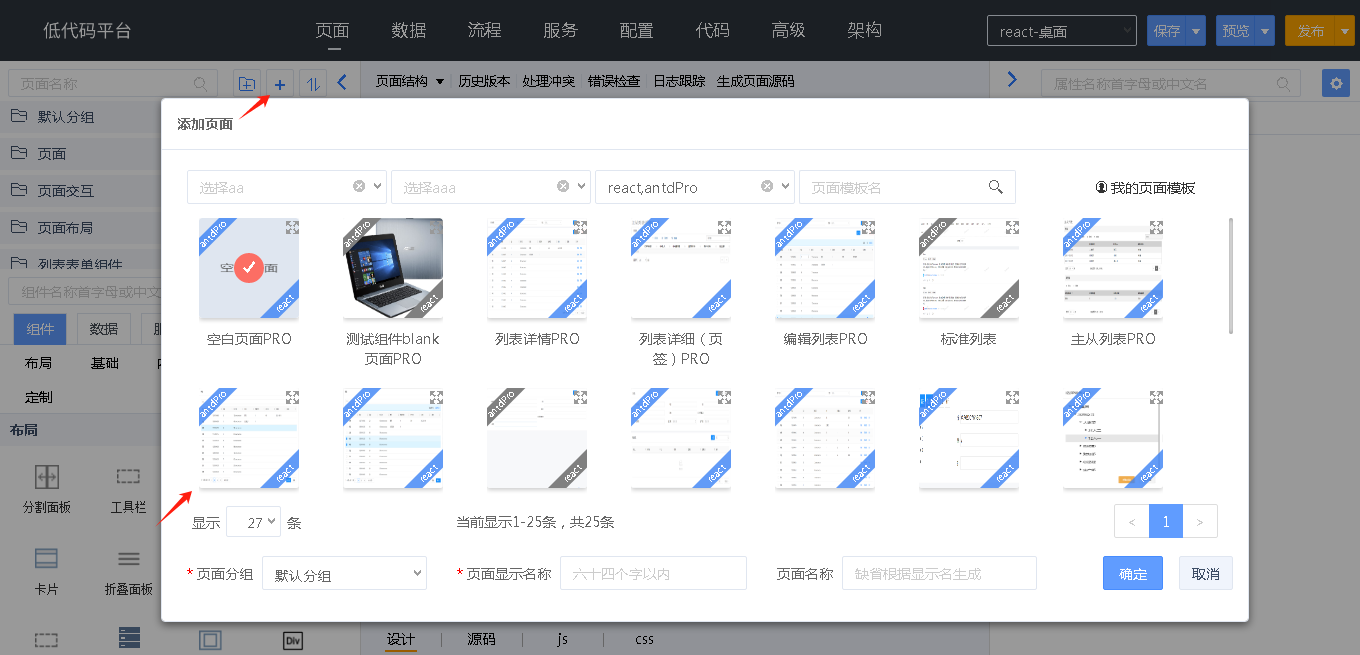
页面模板包括若干配置页,用于配置数据集、列表、表单、功能命名等信息。可以通过预览图查看页面模板效果图
页面模板实现原理
系统提供配置页,在页面模板中配置,在页面向导中显示。用户通过页面向导,完成配置页参数的设置。向导的最后,将这些参数值替换在页面模板文件中定义的 {{变量名}} ,形成页面文件。
页面模板文件使用模板语言 Handlebars,Handlebars 使用模板与传入的对象来生成文件。
页面模板开发过程
新建页面模板
IDE 中切换到“高级”页签,开启组件开发

IDE 中切换到“页面”页签,鼠标移至“+”添加市场组件,点击按钮图标,打开“市场组件”页面

打开“市场组件”页面后,选择“+新建组件包”,进入选择向导模板页面

在选择向导模板页面,输入“页面向导”进行过滤,选择相关技术架构的页面向导,点击确定按钮进入新建页面向导页面

进入新建页面向导后,填写基本信息,点击确定按钮后,页面模板已经新建完毕

新建好的空白页面模板目录结构如下

开发页面模板
步骤如下
- 开发页面文件
- 将文件内容,复制到模板文件 {{$fileName}}.* 中
- 在配置文件 template.config.xml 中添加页面模板需要的配置页
- 使用配置页的输出参数,改写 {{$fileName}}.* 文件
开发页面文件
开发的页面文件的示例代码如下:
页面.w 源码
<antdpro:Page class="x-page" id="page" uix="true" xmlns:antdpro="$UI/comp/antdpro/components" xmlns:attr="http://www.wex5.com/attr" xmlns:bind="http://www.wex5.com/wx/bind" xmlns:catch="http://www.wex5.com/wx/event/catch" xmlns:ext="http://www.wex5.com/ext" xmlns:on="http://www.wex5.com/wx/event/on" xmlns:wx="$UI/wxsys/comps">
    <wx:model id="model" style="left:0px;top:0px;height:auto;position:absolute">
        <wx:wxApi designer_label="通用接口" id="wxapi"/>
        <wx:commonOperation designer_label="操作扩展" id="commonOperation" xmlns:wx="$UI/wxsys/comps"/>
        <wx:restData _created="true" auto="load" className="/uaa/users" designer_label="用户(用户服务)" id="dialogData" limit="10" microServiceName="" restResource="class" url="/dbrest" version="2.0.33">
            <treeOption id="default0"/>
        </wx:restData>
        <wx:restData _created="true" className="/uaa/users" designer_label="选择的数据" id="selectData" microServiceName="" restResource="class" url="/dbrest" version="2.0.33">
            <treeOption id="default1"/>
        </wx:restData>
    </wx:model>
    <wx:inVisibleCompContainer id="inVisibleCompContainer0"/>
    <antdpro:Space direction="vertical" id="space0" size="small" style="width:100%">
        <antdpro:SmartFilter allowClear="true" filterColumns="password,email" id="smartFilter0" placeholder="搜索" searchDataId="dialogData"/>
        <antdpro:ToolBar class="x-toolbar c-selected" id="toolBar1">
            <antdpro:List bind:items="selectData.value" id="list0" item="item1" pureLoop="true">
                <attr:renderItem class="x-renderItem" d_canAddChild="true" designer_label="列表模板" id="default2">
                    <antdpro:Tag closable="true" id="tag0" on:onClose="{'operation':'commonOperation.removeData','args':{'data':'selectData','rows':'js:$row.id'}}" text="{$row.username }"/>
                </attr:renderItem>
            </antdpro:List>
            <attr:toolBarExtra class="toolBarExtra" d_canAddChild="true" designer_label="右侧区域" id="toolBarExtra1">
                <antdpro:Typography.Text id="typographyText5" text="已选择"/>
                <antdpro:Typography.Text id="typographyText6" text="{selectData.count($row)}"/>
                <antdpro:Typography.Text id="typographyText7" text="项"/>
                <antdpro:Button id="button2" on:onClick="{'operation':'selectData.clear'}" text="全部取消" type="link"/>
            </attr:toolBarExtra>
        </antdpro:ToolBar>
        <antdpro:Table bind:items="dialogData.value" id="table0" item="item" pagination="false" rowSelectedDataId="selectData" size="middle">
            <antdpro:Table.Column class="column" dataIndex="username" id="tableColumn_6" sorter="{{"compare":false}}" width="120px">
                <attr:title id="title6">
                    <antdpro:Typography.Text id="typographyText_6" text="用户名"/>
                </attr:title>
                <attr:render id="render6"/>
            </antdpro:Table.Column>
            <antdpro:Table.Column class="column" dataIndex="password" id="tableColumn_7" sorter="{{"compare":false}}" width="120px">
                <attr:title id="title7">
                    <antdpro:Typography.Text id="typographyText_7" text="密码"/>
                </attr:title>
                <attr:render id="render7"/>
            </antdpro:Table.Column>
            <antdpro:Table.Column class="column" dataIndex="email" id="tableColumn_8" sorter="{{"compare":false}}" width="120px">
                <attr:title id="title8">
                    <antdpro:Typography.Text id="typographyText_8" text="邮箱"/>
                </attr:title>
                <attr:render id="render8"/>
            </antdpro:Table.Column>
            <antdpro:Table.Column class="column" dataIndex="lastLogonSuccessTime" id="tableColumn_9" sorter="{{"compare":false}}" width="120px">
                <attr:title id="title9">
                    <antdpro:Typography.Text id="typographyText_9" text="最后登录时间"/>
                </attr:title>
                <attr:render id="render9"/>
            </antdpro:Table.Column>
        </antdpro:Table>
        <antdpro:Pagination bind:items="dialogData.value" class="x-pagination" id="pagination0"/>
        <antdpro:ToolBar class="x-toolbar" id="toolBar0">
            <attr:toolBarExtra class="toolBarExtra" d_canAddChild="true" designer_label="右侧区域" id="toolBarExtra0">
                <antdpro:Button id="button0" on:onClick="{'operation':'commonOperation.close'}" text="取消"/>
                <antdpro:Button id="button1" on:onClick="{'operation':'commonOperation.okclose','args':{'data':'selectData'}}" text="确定" type="primary"/>
            </attr:toolBarExtra>
        </antdpro:ToolBar>
    </antdpro:Space>
</antdpro:Page>
页面.w.meta 源码
{
    "devMode": "source",
    "fileMode": "pc",
    "modules": [
        "antdpro"
    ],
    "label": "列表多选"
}
页面.js 源码
import Page from "$UI/wxsys/comps/reactContainer/page/Page";
export default class IndexPage extends Page {
    constructor(props, context) {
        super(props, context);
    }
}
页面.css 源码
.c-selected{
    background:var(--ant-color-bg-base, #fff);
    padding-left:8px !important;
    border:1px solid var(--ant-color-border, #d9d9d9);
    border-radius:1px;
    margin:0px;
    :global{
        .ant-tag{
            margin-right:0px;
        }
    }
}
复制文件内容到模板文件中
把页面文件内容复制到页面模板的同类型模板文件中,例如 .w 内容拷贝至 {{$fileName}}.w 中
在配置文件中添加配置页
在配置文件 template.config.xml 中,添加数据集配置页、列表配置页(如果页面中有表格或列表)、表单配置页(如果页面中有表单)、功能命名配置页。示例代码如下
<wizard text="列表多选" desc="列表多选">
    <steps>
        <item text="主数据" configPage="$UI/system/designer/tplWizard/configPages/mainData.w" id="data">
            <param name="inputIdColumn" value="true" dataType="string"/>
        </item>
        <item text="主页视图" configPage="$UI/system/designer/tplWizard/configPages/showListView.w"  id="list">
            <param name="data" value="data"/>
        </item>
        <item text="功能命名" configPage="$UI/system/designer/tplWizard/configPages/filename.w" id="fileName"></item>
    </steps>
</wizard>
用配置页的输出参数,改写模板文件
在添加页面的页面向导中,显示配置页,根据配置形成不同的输出参数,模板文件中使用这些输出参数,才能生成不同的页面文件。
将配置页的输出参数写入 {{$fileName}}.w 文件,示例代码如下
<antdpro:Page xmlns:antdpro="$UI/comp/antdpro/components" xmlns:attr="http://www.wex5.com/attr" xmlns:bind="http://www.wex5.com/wx/bind" xmlns:catch="http://www.wex5.com/wx/event/catch" xmlns:ext="http://www.wex5.com/ext" xmlns:on="http://www.wex5.com/wx/event/on" xmlns:wx="$UI/wxsys/comps" class="x-page" id="page" uix="true">
    <wx:model id="model" style="left:0px;top:0px;height:auto;position:absolute">
        <wx:wxApi id="wxapi" designer_label="通用接口"/>
        <wx:commonOperation xmlns:wx="$UI/wxsys/comps" id="commonOperation" designer_label="操作扩展"/>
        <wx:restData _created="true" auto="load" microServiceName="{{data.microServiceName}}" limit="10" className="{{data.className}}" id="dialogData" designer_label="{{data.label}}"  restResource="class" url="/dbrest" version="2.0.33">
            <treeOption id="default0"/>
            {{#compare list.hasNo '==' '1'}}
                <column id="default_1" label="序号" name="noCol" type="String"></column>
                <rule id="rule_0">
                    <col id="default_3" name="noCol">
                    <calculate id="default_4">
                        <expr id="default_5">
                            <![CDATA[dialogData.getIndex($row)/*{"dependencies":["mainData"]}*/]]>
                        </expr>
                    </calculate>
                    </col>
                </rule>
            {{/compare}}
        </wx:restData>
        <wx:restData _created="true" microServiceName="{{data.microServiceName}}" className="{{data.className}}" id="selectData" designer_label="选择的数据"  restResource="class" url="/dbrest" version="2.0.33">
            <treeOption id="default1"/>
        </wx:restData>
    </wx:model>
    <wx:inVisibleCompContainer id="inVisibleCompContainer0"/>
    <antdpro:Space direction="vertical" id="space0" style="width:100%" size="small">
        <antdpro:SmartFilter allowClear="true" filterColumns="{{list.filterCols}}" id="smartFilter0" placeholder="搜索" searchDataId="dialogData"/>
        <antdpro:ToolBar class="x-toolbar c-selected" id="toolBar1">
            <antdpro:List bind:items="selectData.value" id="list0" item="item1" pureLoop="true">
                <attr:renderItem class="x-renderItem" d_canAddChild="true" id="default2" designer_label="列表模板">
                    <antdpro:Tag closable="true" id="tag0" on:onClose="{'operation':'commonOperation.removeData','args':{'data':'selectData','rows':'js:$row.{{data.idColumn}}'}}" text="{$row.{{list.columns.0.name}} }" />
                </attr:renderItem>
            </antdpro:List>
            <attr:toolBarExtra class="toolBarExtra" d_canAddChild="true" designer_label="右侧区域" id="toolBarExtra1">
                <antdpro:Typography.Text id="typographyText5" text="已选择"/>
                <antdpro:Typography.Text id="typographyText6" text="{selectData.count($row)}"/>
                <antdpro:Typography.Text id="typographyText7" text="项"/>
                <antdpro:Button id="button2" on:onClick="{'operation':'selectData.clear'}" text="全部取消" type="link"/>
            </attr:toolBarExtra>
        </antdpro:ToolBar>
        <antdpro:Table size="middle" bind:items="dialogData.value" id="table0" item="item" pagination="false" rowSelectedDataId="selectData">
            {{#compare list.hasNo '==' '1'}}
                <antdpro:Table.Column class="column" dataIndex="noCol" id="tableCol" width="30px">
                    <attr:title id="titleCol">
                        <antdpro:Typography.Text id="typographyTextCol" text="序号"/>
                    </attr:title>
                    <attr:render id="renderCol"/>
                </antdpro:Table.Column>
            {{/compare}}
            {{#each list.columns}}
                <antdpro:Table.Column class="column" dataIndex="{{name}}" id="tableColumn_{{index}}" width="120px" sorter="\{{"compare":false}}">
                    <attr:title id="title{{index}}">
                        <antdpro:Typography.Text id="typographyText_{{index}}" text="{{label}}"/>
                    </attr:title>
                    {{#compare columnEditor '==' 'input'}}
                    <attr:render id="render{{index}}">
                        <antdpro:Input bind:ref="$row.{{name}}" id="input_{{index}}"/>
                    </attr:render>
                {{/compare}}
                {{#compare columnEditor '==' 'img'}}
                    <attr:render id="render{{index}}">
                        <antdpro:Image bind:src="$row.{{name}}" id="image_{{index}}" style="width:100px;height:100px"/>
                    </attr:render>
                {{/compare}}
                {{#compare columnEditor '==' 'attch'}}
                    <attr:render id="render{{index}}">
                        <antdpro:Upload bind:ref="$row.{{name}}" id="upload_{{index}}"/>
                    </attr:render>
                {{/compare}}
                {{#compare columnEditor '==' 'btn'}}
                    <attr:render id="render{{index}}">
                        <antdpro:Button text="按钮" id="button_{{index}}"/>
                    </attr:render>
                {{/compare}}
                {{#compare columnEditor '==' 'select'}}
                    <attr:render id="render{{index}}">
                        <antdpro:Select id="select_{{index}}" placeholder="请选择..." bind:ref="$row.{{name}}"/>
                    </attr:render>
                {{/compare}}
                {{#compare columnEditor '==' 'radio'}}
                    <attr:render id="render{{index}}">
                        <antdpro:Radio.Group id="radioGroup_{{index}}" bind:ref="$row.{{name}}"/>
                    </attr:render>
                {{/compare}}
                {{#compare columnEditor '==' 'checkbox'}}
                    <attr:render id="render{{index}}">
                        <antdpro:Checkbox.Group id="checkboxGroup_{{index}}" bind:ref="$row.{{name}}"/>
                    </attr:render>
                {{/compare}}
                {{#compare columnEditor '==' 'switch'}}
                    <attr:render id="render{{index}}">
                        <antdpro:Switch id="switch_{{index}}" bind:ref="$row.{{name}}"/>
                    </attr:render>
                {{/compare}}
                {{#compare columnEditor '==' 'text'}}
                    <attr:render id="render{{index}}">
                        <antdpro:Input.TextArea id="inputTextArea_{{index}}" bind:ref="$row.{{name}}"/>
                    </attr:render>
                {{/compare}}
                {{#unless columnEditor}}
                    <attr:render id="render{{index}}" />
                {{/unless}}
                </antdpro:Table.Column>
            {{/each}}
        </antdpro:Table>
        <antdpro:Pagination bind:items="dialogData.value" class="x-pagination" id="pagination0" />
        <antdpro:ToolBar class="x-toolbar" id="toolBar0">
            <attr:toolBarExtra class="toolBarExtra" d_canAddChild="true" designer_label="右侧区域" id="toolBarExtra0">
                <antdpro:Button id="button0" text="取消" on:onClick="{'operation':'commonOperation.close'}"/>
                <antdpro:Button id="button1" text="确定" on:onClick="{'operation':'commonOperation.okclose','args':{'data':'selectData'}}" type="primary"/>
            </attr:toolBarExtra>
        </antdpro:ToolBar>
    </antdpro:Space>
</antdpro:Page>
将配置页的输出参数写入 {{$fileName}}.w.meta 文件,示例代码如下
{
    "devMode": "source",
    "fileMode": "pc",
    "modules": [
        "antdpro"
    ],
    "label": "{{$fileLabel}}"
}
测试页面模板
新建的页面模板可以直接使用,新建页面时即可看到新建的页面模板,添加页面即可测试。
发布页面模板
发布页面模板和发布组件类似,都是发布到组件市场。
添加依赖文件
页面模板文件是下面这样的目录结构,其中 package.dependencies.json 定义模板依赖的组件库

桌面端 React 页面模板依赖 antdpro 组件库,package.dependencies.json 文件内容如下
{
    "dependencies": {
        "antdpro":"*"
    }
}
桌面端 Vue 页面模板依赖 antdv 组件库,package.dependencies.json 文件内容如下
{
    "dependencies": {
        "antdv":"*"
    }
}
移动端 React 页面模板依赖 vantui 和 flexbox 组件库,package.dependencies.json 文件内容如下
{
    "dependencies": {
        "flexbox": "*",
        "vantui":"*"
    }
}
移动端 Vue 页面模板依赖 vant 和 flexbox 组件库,package.dependencies.json 文件内容如下
{
    "dependencies": {
        "flexbox": "*",
        "vant":"*"
    }
}
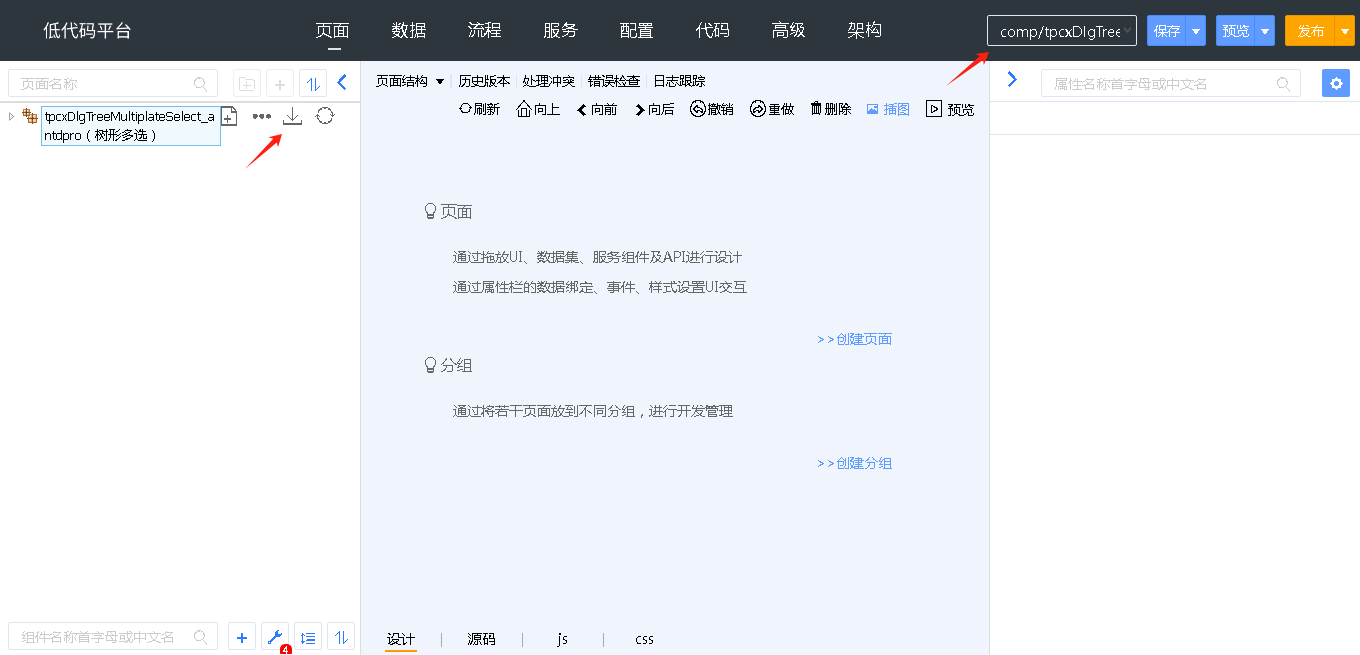
导出页面模板包
切换到页面模板端,点击页面模板的导出按钮,下载 zip 文件
上传市场
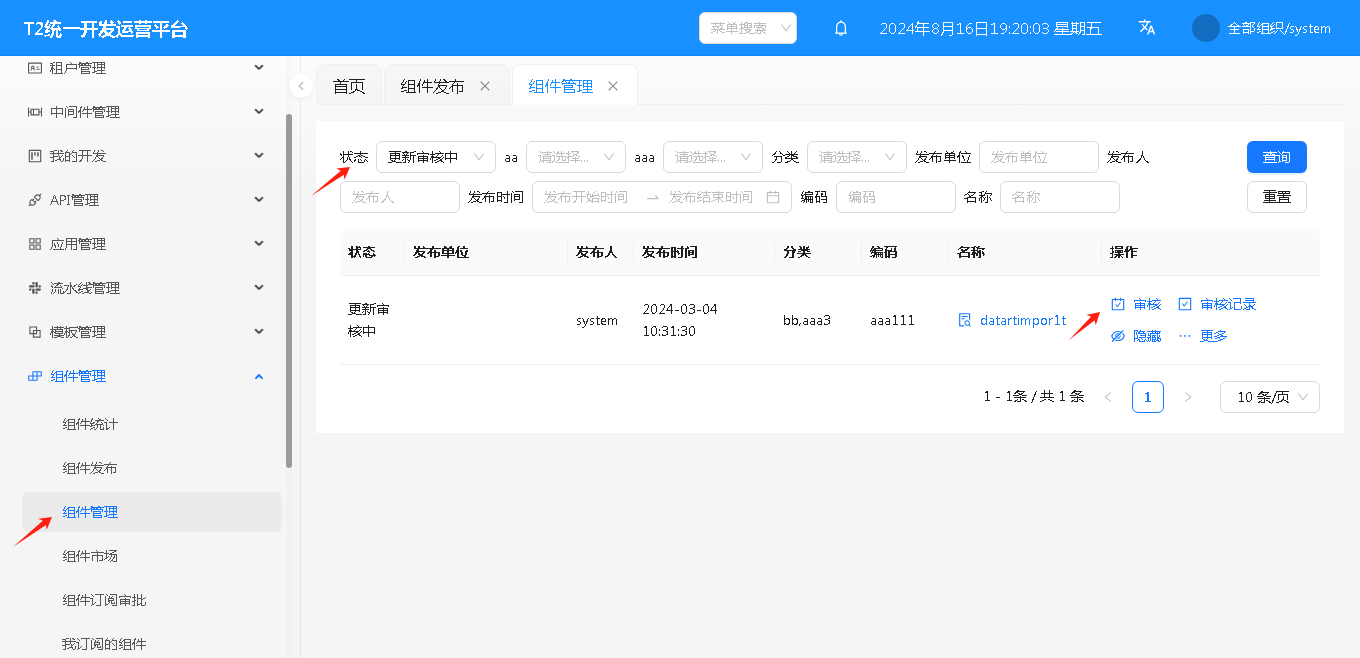
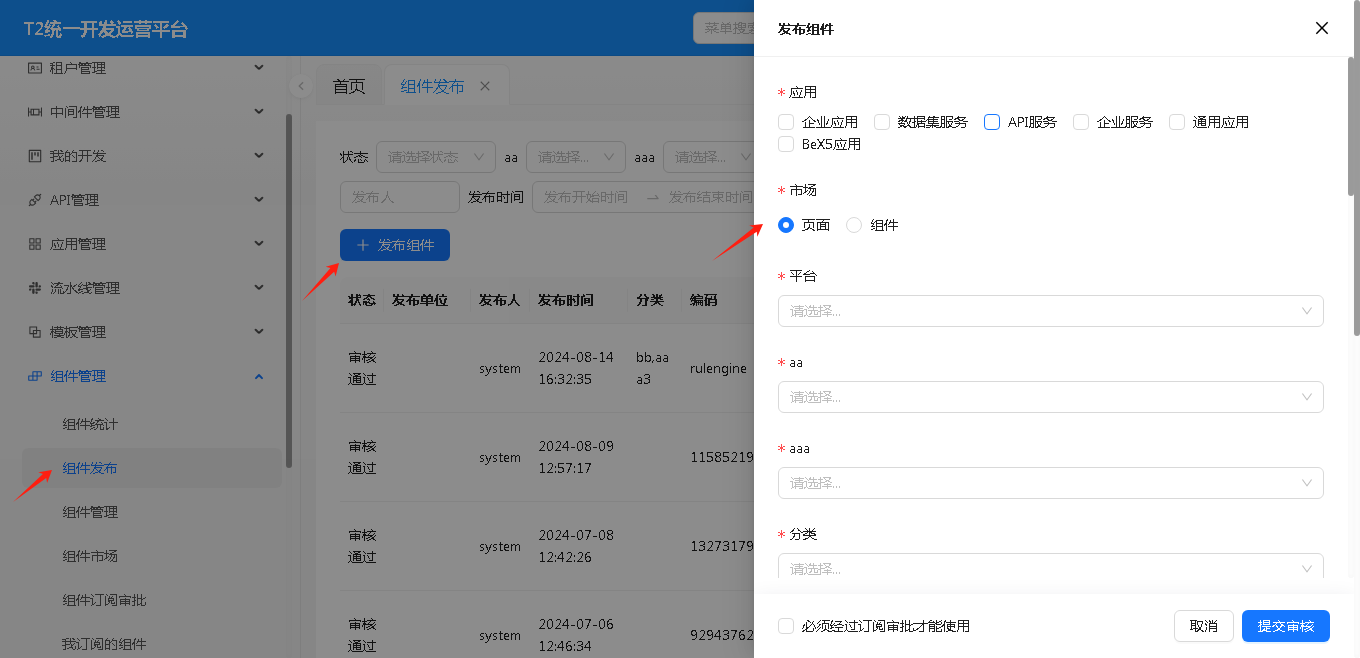
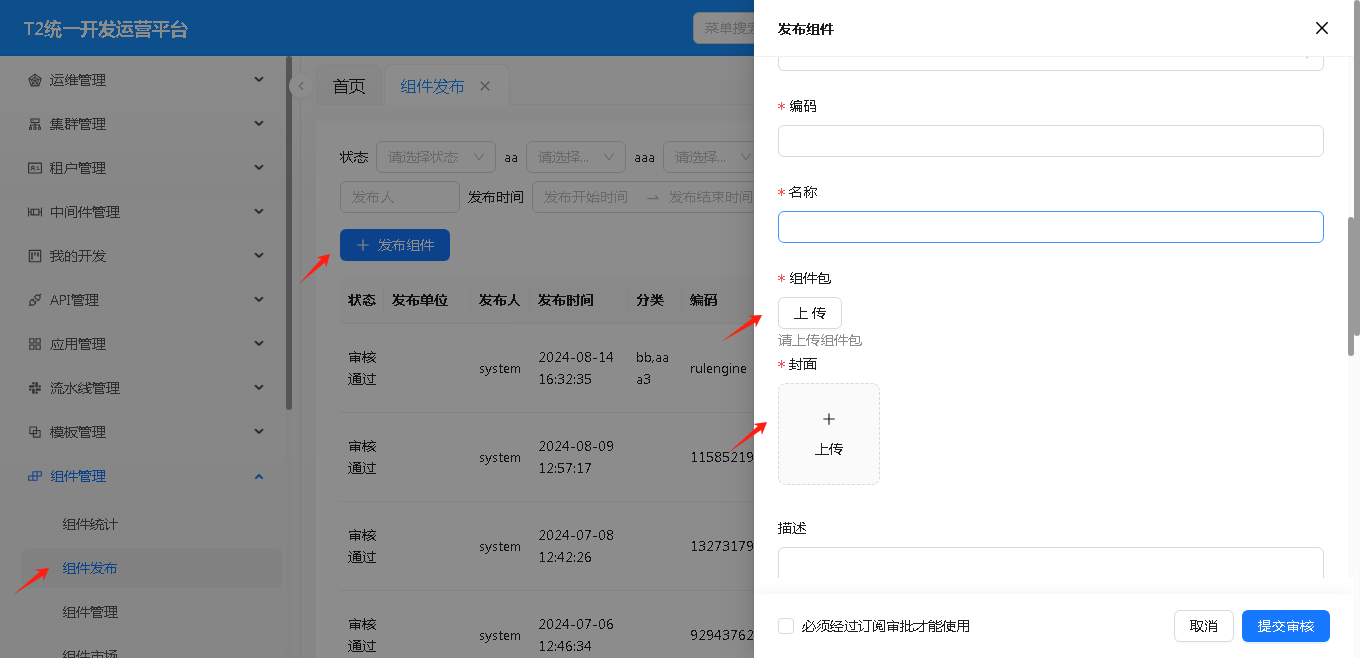
登录控制台,打开“组件管理-组件发布”,进入“组件发布”页面后,点击“发布组件” 按钮
- 市场选择“页面”(代表发布页面模板)
- 上传组件包
- 上传封面(封面在两个地方显示,一是在组件市场中显示,二是在页面向导中显示的预览图)
- 点击提交审核按钮
打开“组件管理-组件管理”,找到提交审核的页面模板,点击“审核”按钮,审核通过后,在所有人的添加页面窗口中,即可看到页面模板