分布式事务调用
场景描述
以请求为事务核心,一个请求内的数据库操作在一个事务
实现思路
使用批请求,请求开始启动事务,请求结束提交事务;
实现步骤
可以在前端实现也可以在后端实现
前端提供的有批请求组件和BatchRequest类,实现批相关,exec()执行批返回promise
transaction: 是否启动事务,默认true
concurrent: 是否并发执行,默认false
model/page: 页面对象(需要注意这个参数的名字,在小程序端是page,在桌面端是model)
需要注意的时,使用分布式事务时需要从市场组件中引入“批请求”组件。
一、使用组件调用
前端使用批请求组件的操作实现批请求,或者js代码中调用需要在一个批中执行的组件的操作:
使用批请求组件的操作实现批请求
多个数据集的保存在同一个批请求中执行、数据的保存和服务组件的请求需要在同一个批请求中执行或多个服务组件的请求需要在同一个批请求中执行等多种需要批请求执行的组合都可以通过批组件设置操作实现
如下:点击按钮实现两个数据集组件的保存在同一个批请求中执行
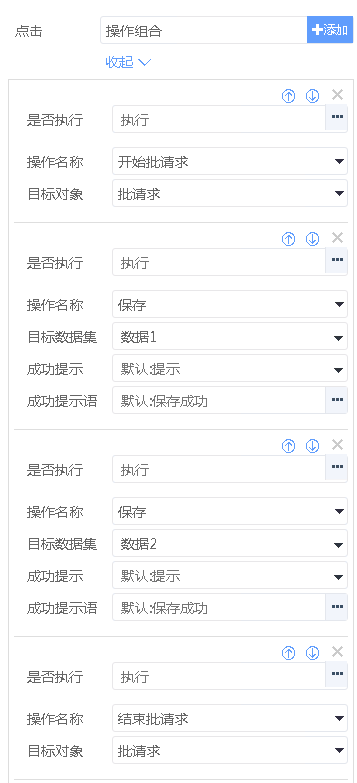
按钮的点击事件中选择操作组合,然后选择批请求组件的开始请求,最后选择批请求组件的结束请求,中间的就选择要执行的请求
js中通过API实现执行数据集或服务请求等组件方法的批请求
js中调用多个数据集的保存、多个服务组件的请求或者数据集保存和请求同时调用等多钟组合需要在同一个批请求中执行也是可以的。
如下:实现数据集保存和服务请求在同一个批请求中执行
react的页面:
var self= this;
wx.request.batch(function(batchReq){
    self.comp('restData').saveData({batch:batchReq}); //数据组件的保存
    self.comp('serviceRequest').send({batch:batchReq}); //服务组件的请求
}, {transaction: true, page: this});
vue的页面:
let restData=useData("restData");
let onButtonClick = (event) => {
    wx.request.batch(function(batchReq){
        restData.saveData({batch:batchReq}); //数据组件的保存
        $page.comp('serviceRequest').send({batch:batchReq}); //服务组件的请求
    }, {transaction: true, page: $page});
}
二、代码调用案例
具体的使用参考下面的说明,案例中都是第三个应用中调用另外两个应用中的服务为例的,另外两个应用中的服务定义就跟不使用分布式事务一样的定义:
1 前端react页面中实现
添加引用:import BatchRequest from "$UI/wxsys/lib/base/batchRequest";
第一种调用方式:
this.request中增加batch参数:BatchRequest对象实例,相同batch为同一个批操作,没有batch参数为立执行请求
在批中等待批提交后返回才执行success、fail、complete回调
        let batchReq = new BatchRequest({page:this,transaction: true,concurrent: false});
        this.request({
                batch:batchReq,
                header: {
                    "withCredentials":true
                },
                url:this.getServiceUrl("/main/fenbusdemo1/fuwuy?code=2","batchdemo1"),
                dataType: 'text',
                method: 'POST',
                success: function(res){
                    console.log("请求1执行成功!");
                },
                fail: function(err){
                    console.error(err);
                }
        });
        this.request({
                batch:batchReq,
                header: {
                    "withCredentials":true
                },
                url: this.getServiceUrl("/main/shiwucse/shiwucs?num=1","batchdemo2"),
                dataType: 'text',
                method: 'POST',
                success: function(res){
                    console.log("请求2执行成功!");
                },
                fail: function(err){
                    console.error(err);
                }
        });
        batchReq.exec();
第二种实现方式:
此方式简化了批请求(不需要关心批创建和提交)会自动创建BatchRequest并执行传入函数,根据函数返回(为promise时等待promise)执行BatchRequest.exec()提交批操作
        var self = this;
        wx.request.batch(function(batchReq){
           self.request({
                batch:batchReq,
                header: {
                    "withCredentials":true
                },
                url:self.getServiceUrl("/main/fenbusdemo1/fuwuy?code=5","batchdemo1"),
                dataType: 'text',
                method: 'POST',
                success: function(res){
                    console.log("请求1执行成功!");
                },
                fail: function(err){
                    console.error(err);
                }
            });
            self.request({
                batch:batchReq,
                header: {
                    "withCredentials":true
                },
                url: self.getServiceUrl("/main/shiwucse/shiwucs?num=5","batchdemo2"),
                dataType: 'text',
                method: 'POST',
                success: function(res){
                    console.log("请求2执行成功!");
                },
                fail: function(err){
                    console.error(err);
                }
            });
        }, {page:this, transaction: true,concurrent: false});
2 前端vue页面中实现
添加引用:import BatchRequest from "$UI/wxsys/lib/base/batchRequest";
第一种实现方式:同react页面的第一种实现方式
    let batchReq = new BatchRequest({page:$page,transaction: true,concurrent: false});
    $page.request({
            batch:batchReq,
            header: {
                "withCredentials":true
            },
            url:$page.getServiceUrl("/main/fenbusdemo1/fuwuy?code=5","batchdemo1"),
            dataType: 'text',
            method: 'POST',
            success: function(res){
                console.log("请求1执行成功!");
            },
            fail: function(err){
                console.error(err);
            }
    });
    $page.request({
            batch:batchReq,
            header: {
                "withCredentials":true
            },
            url: $page.getServiceUrl("main/shiwucse/shiwucs?num=5","batchdemo2"),
            dataType: 'text',
            method: 'POST',
            success: function(res){
                console.log("请求2执行成功!");
            },
            fail: function(err){
                console.error(err);
            }
    });
    batchReq.exec();
第二种实现方式:同react页面的第二种实现方式
    wx.request.batch(function(batchReq){
        $page.request({
            batch:batchReq,
            header: {
                "withCredentials":true
            },
            url:$page.getServiceUrl("/main/fenbusdemo1/fuwuy?code=5","batchdemo1"),
            dataType: 'text',
            method: 'POST',
            success: function(res){
                console.log("请求1执行成功!");
            },
            fail: function(err){
                console.error(err);
            }
        });
        $page.request({
            batch:batchReq,
            header: {
                "withCredentials":true
            },
            url: $page.getServiceUrl("/main/shiwucse/shiwucs?num=5","batchdemo2"),
            dataType: 'text',
            method: 'POST',
            success: function(res){
                console.log("请求2执行成功!");
            },
            fail: function(err){
                console.error(err);
            }
        });
    }, {page:$page, transaction: true,concurrent: false});
3 后端服务实现
通过设计创建服务请求时提的有“启用分布式事务”选项,勾选后在此服务请求的操作就会在同一个事务中
![]()
在第三个应用中的服务定义时勾选上“启用分布式事务”,然后在代码直接通过API调用另外两个应用的服务即可:
public void fenbusswdy() throws Exception {
    //请添加你的业务代码
    //调用batchdemo1应用的服务
    ServiceUtil.get(SpringWebUtil.getRequest(),"batchdemo1", "/main/fenbusdemo1/fuwuy?code=5", null);

    //调用batchdemo2应用的服务
    ServiceUtil.post(SpringWebUtil.getRequest(),"batchdemo2","/main/shiwucse/shiwucs?num=5", null);
    return;
}
如果第三个应用中的服务是自定义Controller实现的,要使用分布式事务,可以直接使用@GlobalTransactional注解实现。
具体实现如下:
第三个应用中的服务定义使添加注解,然后直接通过API调用另外两个应用的服务:
添加import com.justep.tools.db.GlobalTransactional;
@RequestMapping(value = "/main/fuwu/fenbusswdy", method = RequestMethod.POST)
@GlobalTransactional
public void fenbusswdy() throws Exception {
    //请添加你的业务代码
    //调用batchdemo1应用的服务
    ServiceUtil.get(SpringWebUtil.getRequest(),"batchdemo1", "/main/fenbusdemo1/fuwuy?code=5", null);

    //调用batchdemo2应用的服务
    ServiceUtil.post(SpringWebUtil.getRequest(),"batchdemo2","/main/shiwucse/shiwucs?num=5", null);
    return;
}
案例说明:
batchdemo1、batchdemo2是另外两个应用的应用名
/main/fenbusdemo1/fuwuy、/main/shiwucse/shiwucs是服务地址
code和num是服务的参数
前端在调用请求的时候url的拼接方式需要参考上面案例中的方式使用API拼接